Receiving JSON Data via HTTP POST with PHP

This blog post is brought to you by the developer of BitBudget. BitBudget is an automated budgeting app for Android and iOS which syncs with your bank account and helps you avoid overspending. If you’d like to quit living paycheck-to-paycheck and get a better handle on your finances, download it today! https://bitbudget.io

If you happen to follow my blog you know that I’ve been working on this new app called WingsuitGP (Air Races Powered by iPhone). Yesterday while working on the app I found myself a little stumped having to do something I’ve never done before… how do I receive JSON data via HTTP POST with PHP?

In the past I’ve used PHP many times to spit out JSON data back to a web or mobile app. But with WingsuitGP I’m having to do the opposite. The mobile app is the one spitting out the JSON, and the backend PHP script is on the receiving end of these data. So I just wanted to sort of bookmark this cool blog post I found from thisinterestsme.com on how to go about doing this: Receiving JSON POST data via PHP

UPDATE
I found another excellent post on StackOverflow.com: Receive JSON POST with PHP

Also, here is an example demonstrating how to send JSON data via HTTP POST using client-side JavaScript: What is the way to send a JSON object via a POST request in JavaScript (not jQuery or Nodejs)?


How to Dismiss the Keyboard in iOS

This blog post is brought to you by the developer of BitBudget. BitBudget is an automated budgeting app for Android and iOS which syncs with your bank account and helps you avoid overspending. If you’d like to quit living paycheck-to-paycheck and get a better handle on your finances, download it today! https://bitbudget.io

First, drag the ‘Tap Gesture Recognizer’ from Object Library onto Background. Then control-drag from ‘Tap Gesture Recognizer’ to ViewController.swift to add the dismissKeyboard() @IBAction. And last, call the resignFirstResponder() method from within the dismissKeyboard function to then dismiss the keyboard.

@IBAction func dismissKeyboard(_ sender: UITapGestureRecognizer) {
mySuperSweetTextField.resignFirstResponder()
}
 

No such module 'Alamofire'

This blog post is brought to you by the developer of BitBudget. BitBudget is an automated budgeting app for Android and iOS which syncs with your bank account and helps you avoid overspending. If you’d like to quit living paycheck-to-paycheck and get a better handle on your finances, download it today! https://bitbudget.io

Ran into another annoying error message tonight while messing around with the Alamofire networking library for iOS. Actually, it was two annoying error messages:
No such module ‘Alamofire’
and…
Module ‘Alamofire’ has no member ‘request’
It looks like the documentation for Alamofire is out of sync with the latest version of Alamofire. So simply open up your podfile and change the Alamofire version back to 4.8.1 instead of version 5.0.0. Then go ahead and run $ pod update and all will be well!


Invalid initializer call with same type 'FileAttributeKey' as parameter

This blog post is brought to you by the developer of BitBudget. BitBudget is an automated budgeting app for Android and iOS which syncs with your bank account and helps you avoid overspending. If you’d like to quit living paycheck-to-paycheck and get a better handle on your finances, download it today! https://bitbudget.io

Ran into a little bug tonight going through the official quick start guide for the Realm Database on iOS. The app which I’m building needs to be able to access the database while running in the background, so according to the Realm documentation developers need to change some security settings for the folder containing the database in order to access that database from the background. Without changing the security settings, the folder containing the database will be encrypted and not accessible when a user’s iPhone is locked. The official documentation suggests adding the following lines of code so that the Realm Database is accessible even when the phone is locked:

let realm = try! Realm()
// Get our Realm file's parent directory
let folderPath = realm.configuration.fileURL!.deletingLastPathComponent().path
// Disable file protection for this directory
try! FileManager.default.setAttributes([FileAttributeKey(rawValue: NSFileProtectionKey): NSFileProtectionNone], ofItemAtPath: folderPath)

However, when I tried using this little snippet of code in my current iOS project (WingsuitGP) I received the following error message: Invalid initializer call with same type ‘FileAttributeKey’ as parameter
Luckily, someone on StackOverflow got me pointed in the right direction: invalid initializer call with same type ‘XXXX’ as parameter
But I still needed a little help from Xcode’s suggested bug fixes to get it to work just right. So here is what I ended up with if anyone else is struggling with this annoying error:

let realm = try! Realm()
// Get our Realm file's parent directory
let folderPath = realm.configuration.fileURL!.deletingLastPathComponent().path
// Disable file protection for this directory
try! FileManager.default.setAttributes([FileAttributeKey.protectionKey: FileProtectionType.none], ofItemAtPath: folderPath)


How To Install a Cocoapod

Quick little blog post here on how to install a Cocoapod into an Xcode project. This is sort of for my own personal reference because I haven’t memorized how to do this yet, but if you need a more in depth tutorial check out How to Install a CocoaPod by Sean Allen.
First, enter a few terminal commands:

$ cd Desktop/SwiftPlayground/MySuperSweetXcodeProject
$ pod init
$ open -a Xcode Podfile


Next, edit (and save) your Podfile:

# Uncomment the next line to define a global platform for your project
# platform :ios, '9.0'
target 'MySuperSweetXcodeProject' do
  # Comment the next line if you're not using Swift and don't want to use dynamic frameworks
  use_frameworks!
  # *** ADD YOUR POD ON THE LINE BELOW ***
  pod 'MySuperSweetCocoaPod'
end


Last, run one final terminal command:

$ pod install


Hello, World with the Realm Database for iOS in Swift

This blog post is brought to you by the developer of BitBudget. BitBudget is an automated budgeting app for Android and iOS which syncs with your bank account and helps you avoid overspending. If you’d like to quit living paycheck-to-paycheck and get a better handle on your finances, download it today! https://bitbudget.io

As I mentioned in my previous post, I’ve been doing a little hacking today using the Realm Database for iOS (using Swift). The official tutorial from Realm is pretty good, but it leaves out where exactly to put certain snippets of code within the Xcode framework as many official tutorials for various programming frameworks and libraries often do. So I just wanted to jot down this quick blog post for my own personal reference, or maybe to help another developer out there in cyber-space to get up and running with the Realm Database for iOS:

  1. Install Realm using the Cocoapods Dependency Manager (See this tutorial for help getting started with Cocoapods if necessary)
  2. Create a New Xcode Project

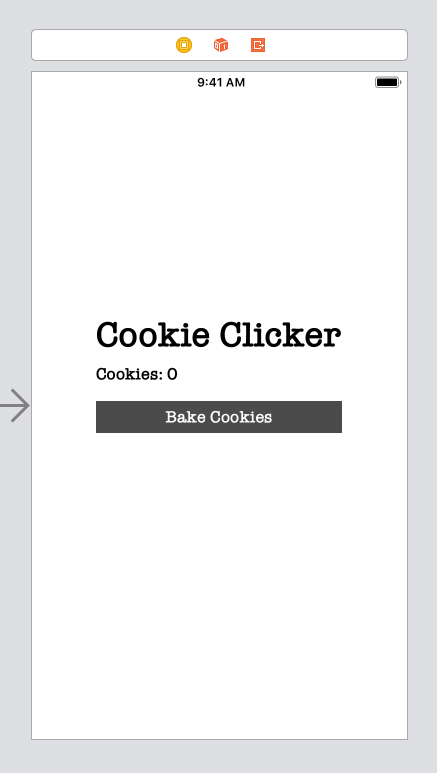
Okay, so now you have you have Realm installed and have created your new Xcode project. Now we are going to make our “hello, world” app inspired by one of the stupidest games of all time: Cookie Clicker
Cookie Clicker is a pretty ridiculous game. The gist of the whole thing is you click a button and then you get cookies. That’s it! Pretty much all there is to it. The only thing is, with Cookie Clicker, you want to be able to save the number of cookies baked in between running the game, so I thought it would make an excellent example for learning the basics of Realm. The app will simply consist of a single screen with a label which displays the number of cookies baked, and a button the user can press to bake more cookies. And using the magic of the Realm Database, we will be able to save the number of cookies baked by our users. In addition to the single screen, we will have one ViewController (ViewController.swift) and another swift file called Cookie.swift which we will use to declare our Cookie class. Just remember to connect the label to the view controller (control-drag) to create your IBOutlet for the cookieCountLabel, and also make an IBAction connection by control-dragging from your bakeCookiesButton to the ViewController.
NOTE: See my previous blog post regarding the error message “Could Not Build the Objective-C Module ‘RealmSwift‘” if necessary.
CookieClickerScreenshot

//
//  ViewController.swift
//  HelloRealm
//
//  Created by Christopher Pedersen on 2/25/19.
//  Copyright © 2019 Christopher Pedersen. All rights reserved.
//
import UIKit
import RealmSwift
class ViewController: UIViewController {
    @IBOutlet weak var cookieCountLabel: UILabel!
    override func viewDidLoad() {
        super.viewDidLoad()
        // Do any additional setup after loading the view, typically from a nib.
        let realm = try! Realm()
        let cookies = realm.objects(Cookie.self)
        let cookieCount: Int = cookies.count
        if cookieCount > 0 {
            cookieCountLabel.text = "Cookies: \(cookieCount)"
        } else {
            cookieCountLabel.text = "Cookies: 0"
        }
    }
    @IBAction func onBakeCookiesButtonClicked(_ sender: Any) {
        let realm = try! Realm()
        let newCookie = Cookie()
        newCookie.type = "Chocolate Chip"
        newCookie.size = "Large"
        let cookies = realm.objects(Cookie.self)
        try! realm.write {
            realm.add(newCookie)
        }
        let cookieCount: Int = cookies.count
        cookieCountLabel.text = "Cookies: \(cookieCount)"
    }
}

//
//  Cookie.swift
//  HelloRealm
//
//  Created by Christopher Pedersen on 2/25/19.
//  Copyright © 2019 Christopher Pedersen. All rights reserved.
//
import Foundation
import RealmSwift
class Cookie: Object {
    @objc dynamic var type = ""
    @objc dynamic var size = ""
}
 

Could Not Build Objective-C Module 'RealmSwift'

This blog post is brought to you by the developer of BitBudget. BitBudget is an automated budgeting app for Android and iOS which syncs with your bank account and helps you avoid overspending. If you’d like to quit living paycheck-to-paycheck and get a better handle on your finances, download it today! https://bitbudget.io

Today I started experimenting with the hot Swift database library ‘Realm’ AKA RealmSwift for iOS and have run into a really annoying error while trying to follow along with the official tutorial: “Could not build Objective-C module ‘RealmSwift'” Luckily someone posted a fairly simple solution that I probably would have never figured out myself on a Github forum. To fix this error in Xcode, simply…

  1. GOTO Product > Scheme > New Scheme
  2. SELECT ‘RealmSwift’ from the Drop-Down Menu
  3. CLICK ‘OK’

And that’s it. Problem solved.
Reference: https://github.com/realm/realm-cocoa/issues/5973


startRelativeAltitudeUpdates on a Background OperationQueue

This blog post is brought to you by the developer of BitBudget. BitBudget is an automated budgeting app for Android and iOS which syncs with your bank account and helps you avoid overspending. If you’d like to quit living paycheck-to-paycheck and get a better handle on your finances, download it today! https://bitbudget.io

Doing a little hacking on my WingsuitGP app tonight so I can take it for a test flight tomorrow. The original prototype used a really ugly work-around to access altitude (pressure) data in the background, so I would like to make a note here of an excellent blog post demonstrating how to properly run altitude updates in the background on iOS: Locating a Snowboarder on a Slope
The example snippets of code I’ve found around the web regarding startRelativeAltitudeUpdates all had the updates running on OperationQueue.main, but after discovering the aforementioned mentioned blog post, it looks like it’s fairly simple to create your own OperationQueue and specify that you would like it to run in the background. I’m sure an experienced iOS developer would have been able to figure this out in 5 min., but… o well! Now I know 🙂

// Code Snippet by swifting.io
// https://swifting.io/blog/2017/10/30/46-locating-a-snowboarder-on-a-slope/
let queue = OperationQueue()
queue.qualityOfService = .background
queue.maxConcurrentOperationCount = OperationQueue.defaultMaxConcurrentOperationCount
let altimeter = CMAltimeter()
altimeter.startRelativeAltitudeUpdates(to: queue,
    withHandler: { data, error in //(CMAltitudeData?, Error?)
        guard error == nil else { return }
        guard let data = data else { return }
        //NOTE: process data 🏂!!!
})


Why You Should Never Register a Domain with Finnish Domain Name Extension (.fi)

This blog post is brought to you by the developer of BitBudget. BitBudget is an automated budgeting app for Android and iOS which syncs with your bank account and helps you avoid overspending. If you’d like to quit living paycheck-to-paycheck and get a better handle on your finances, download it today! https://bitbudget.io

Well this is sort of a strange post, and I’m not sure if it will make any sense to anyone that happens to stumble upon it, but nevertheless, I have something to say about Finnish domain name extensions! I had this great idea the other day to create a web-app that saves all of your Google search queries so that you can blog about the answer after you find it. Think Quora, the question and answer site, except you answer all of your own questions.

Since I’m sort of into domain name hacks, I decided on the name proli.fi/c for my new blogging tool, as the idea for the tool is to greatly increase the number of blog posts that users of the tool write. However… several days later my Finnish domain, registered through 101domain.com, still isn’t ready to use! So if by any chance someone looking into registering a Finnish domain happens to stumble upon this post, don’t do it!
UPDATE: Eventually everything was resolved. For some reason 101domain.com needed to verify my date of birth with the Finns.