javascript for loop over properties in an object

Today at work I was tasked with iterating over a JavaScript (TypeScript) object to find a particular property or key nested somewhere within the object. The tricky part is the object can have infinite nesting, so we don’t know how deep we need to dig to find the needle in the haystack.

I thought someone else may end up needing a solution to this problem, so I decided to write this blog post. I found a StackOverflow article which was pretty helpful, however the author of the answer to that question only posted partial bits of the solution, and didn’t post a complete function.

After a little work on replit.com, I came up with a function that does the job for me. For my use case, I only needed to find one needle in the haystack. If you need to find multiple instances of the same property or key, then you’ll need to re-work my function.

Hope you find this function helpful internet friend!

const originalObject = {
foo: {},
bar: "BAR",
baz: {
a: {},
b: {},
c: {
d: "DDD",
e: "EEE",
f: "FFF",
g: "GGG",
h: "HHH",
i: "III",
j: "JJJ",
k: "KKK",
l: "LLL",
m: "MMM",
n: "NNN",
o: "OOO",
p: "PPP",
}
},
}
function findValueOfPropertyInNestedObject(obj: Object, propertyName: string) {
for (var prop in obj) {
if (Object.prototype.hasOwnProperty.call(obj, prop)) {
const valueOfProperty = obj[prop];
const valueOfPropertyIsObject = typeof valueOfProperty === "object";
const propertyFound = prop === propertyName;
if (propertyFound) {
return valueOfProperty;
}
if (valueOfPropertyIsObject) {
const childValue = findValueOfPropertyInNestedObject(valueOfProperty, propertyName);
if (childValue) {
return childValue;
}
}
}
}
return undefined;
}
const p = findValueOfPropertyInNestedObject(originalObject, "p");
console.log(p);
 

[SOLVED]: node_modules/metro-hermes-compiler/src/emhermesc.js:77 throw ex; Error: EMFILE: too many open files

If you’re a React-Native developer and you’re running into this error when attempting to run your Metro bundler, “too many open files,” the fix is really simple: You need to install watchman.

$ brew install watchman

While setting up my new company issued MacBook Pro with Apple Silicon, I thought this error had something to do with the new chipset and Rosetta, but this did not turn out to be the case. All I ended up having to do was install watchman, which we accidentally removed from our company’s README.

Well I was really hoping for this blog post to be a little bit longer, but that’s all I’ve got! Install watchman and then restart the Metro bundler and you should be good to go.


How to Fix 502 Bad Gateway Errors in Production Flask Apps Running NGINX & Gunicorn

Today I deployed some new code to production for a Flask app that I’m currently building. On my local machine the code which I wrote was running fine without any issues. However, after deploying the code to production I noticed my new endpoint was not working at all and was consistently returning 502 Bad Gateway errors.

A few things I tried tweaking to fix this included updating the config files for NGINX and Gunicorn and explicitly setting timeout durations because the new code that I pushed to production was pretty long running and slow, so I thought maybe something was just timing out. However, after updating my timeout settings in my NGINX and Gunicorn config files to 5 minutes, my code continued to fail in production.

Then I happened to stumble upon a forum post where someone mentioned that this error can sometimes occur if you run out of memory or compute resources. My production server at the time was pretty weak, especially compared to my laptop, running a single CPU with 1 gigabyte of RAM.

The next fix I tried was bumping the resources for my server via DigitalOcean’s server hosting dashboard. And voila! After bumping the resources to 2 CPUs and 4 gigabytes of RAM my code started running as expected, and the 502 bad gateway error went away.

So there you have it. If you have tried bumping the timeout setting for NGINX and Gunicorn and are still running into 502 bad gateway errors, try allocating more CPU and memory resources to your production flask app, and that may fix the issue, especially if the code that is failing is something long running and slow.

UPDATE: I ended up having to bump the resources again, this time to 4 CPUs with 8 gigabytes of RAM.


How to Detect Collisions Between Humanoids in Roblox

Really quick blog post here tonight on how to detect collisions between Humanoids in Roblox. My script is named DetectCollisionsBetweenHumanoids and I’ve placed this script under ServerScriptService. Please note, that I have some code in my example which displays text on the users screen whenever a collision is detected, you can ignore this part of the code which displays that a collision has occurred on the screen:

-- DisplayTextModule is some code I use to display text on screen for testing, if you see this in a code snippet, ignore this part
local DisplayTextModule = require(script.Parent.Parent.StarterGui.ScreenGui.Frame.TextLabel.DisplayTextModuleScript)
local Players = game:GetService("Players")
-- Works for R15, not sure if this works for R6 or not
local function partIsHumanoid(part)
if part.Name == "Head" then
return true
elseif part.Name == "UpperTorso" then
return true
elseif part.Name == "LowerTorso" then
return true
elseif part.Name == "LeftFoot" then
return true
elseif part.Name == "LeftLowerLeg" then
return true
elseif part.Name == "LeftUpperLeg" then
return true
elseif part.Name == "RightFoot" then
return true
elseif part.Name == "RightLowerLeg" then
return true
elseif part.Name == "RightUpperLeg" then
return true
elseif part.Name == "LeftHand" then
return true
elseif part.Name == "LeftLowerArm" then
return true
elseif part.Name == "LeftUpperArm" then
return true
elseif part.Name == "RightHand" then
return true
elseif part.Name == "RightLowerArm" then
return true
elseif part.Name == "RightUpperArm" then
return true
else
return false
end
end
local function onPlayerAdded(player)
local character = player.Character or player.CharacterAdded:Wait()
local humanoid = character:WaitForChild("Humanoid")
humanoid.Touched:Connect(function(otherPart)
local timestampStr = tostring(os.time(os.date("!*t")))
if partIsHumanoid(otherPart) then
DisplayTextModule.Display("Collision w/ R15: " .. otherPart.Name)
end
end)
end
Players.PlayerAdded:Connect(onPlayerAdded)
 

How to Display Text on Screen Programmatically in Roblox

I’m currently working on building my first game in Roblox, and I need to be able to print out some information to the screen for debugging. Normally you can just use “print()” to display text for debugging / texting purposes, but I’ve noticed that this doesn’t work when you’re testing multiplayer functionality. Right now I’m trying to detect collisions between Humanoids, and print just isn’t working for me in this specific circumstance since I have to run the game in multiplayer mode (print works fine for me when just running the game as a single player however).

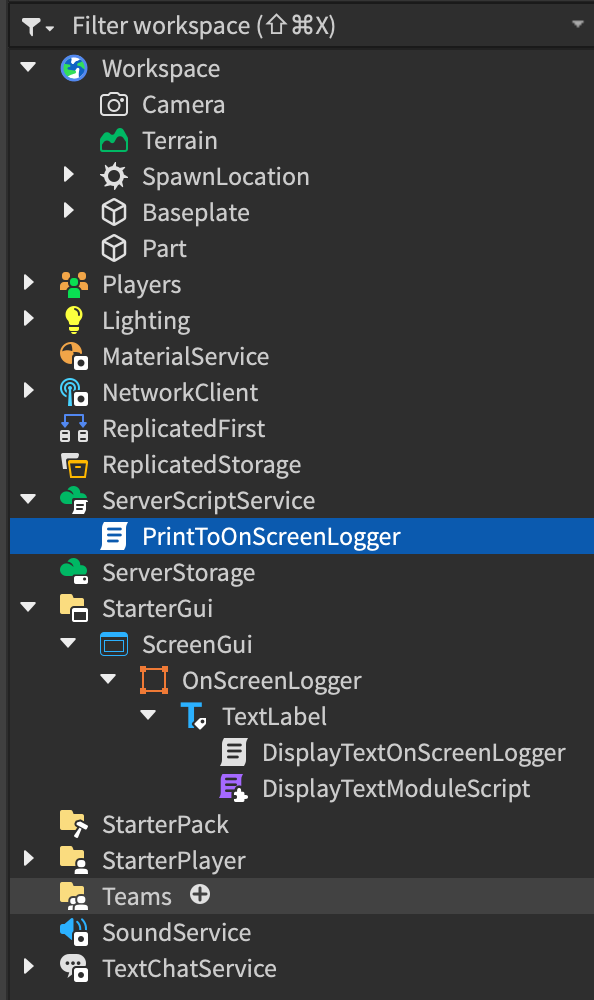
Okay so let’s get to it, how to display text on screen programmatically in Roblox. First you’ll need to add ScreenGui to the StarterGui in Roblox Studio. If you need help with this, reference this tutorial from Roblox on how to add a scoreboard: https://create.roblox.com/docs/tutorials/building/ui/creating-a-score-bar

Then you’ll want to add a TextLabel to your ScreenGui, and after that, add a ModuleScript called DisplayTextModuleScript.

Then under ServerScriptServer, add another script called PrintToOnScreenLogger.

Here is a screenshot of what this initial setup should look like in Roblox Studio:

local module = {}
function Display(text)
local textLabel = script.Parent
textLabel.Text = text
end
module.Display = Display
return module
local DisplayTextModule = require(script.Parent.Parent.StarterGui.ScreenGui.OnScreenLogger.TextLabel.DisplayTextModuleScript)
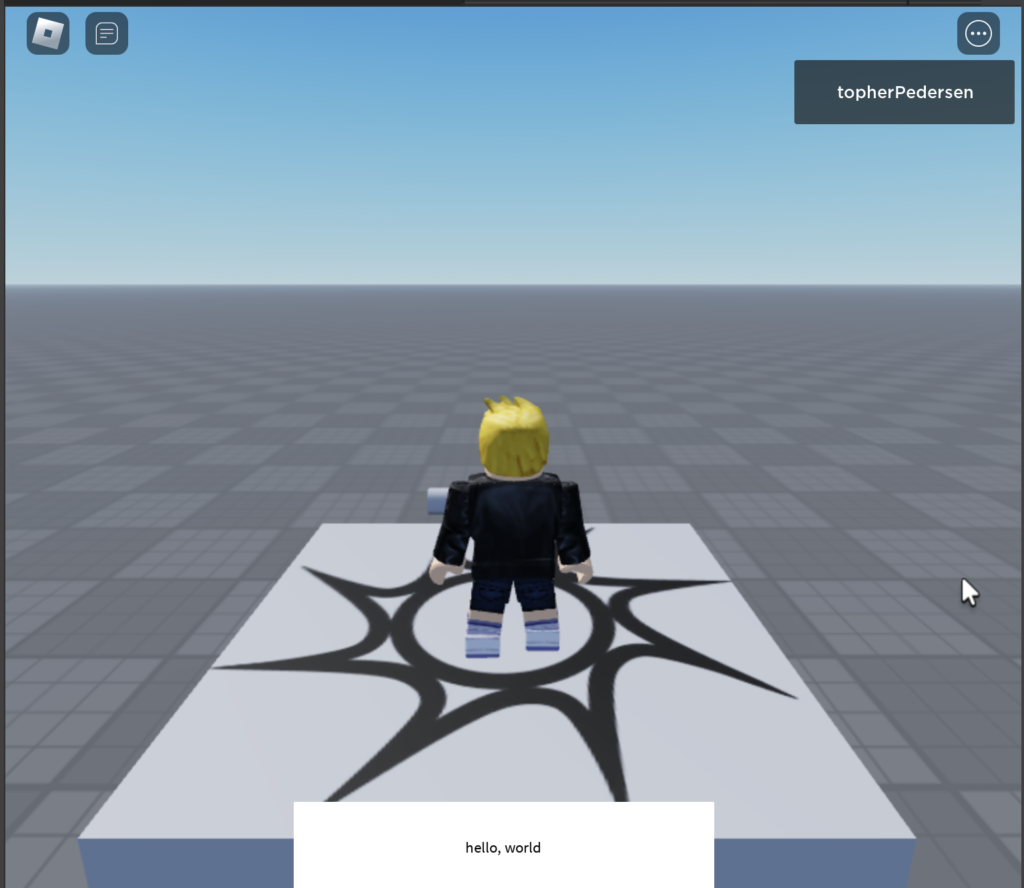
DisplayTextModule.Display("hello, world")

The finished product will look like:


How to Change a Roblox Humanoid’s Appearance using Lua in Roblox Studio

I broke my femur skydiving a couple of weeks ago and am still laid up in a hospital bed recovering. I’ve been meaning to start learning a little Roblox development though, so I’m using this time lying in bed at the hospital to learn Roblox game development.

The first game that I want to make is a zombie game, because I think that’d be fairly simple to create. However, I found that I’ve been having some trouble doing two things:

  1. Detecting collisions between Humanoids
  2. Changing Humanoid’s Appearance (to turn them into zombies)

This quick blog post is just going to cover topic 2, changing humanoid’s appearance. I have a little code snippet that I created tonight that changes a Humanoid’s skin color to neon green so I can represent them as zombies. If you are looking to do something similar, maybe you’ll find this code snippet useful:

local Players = game:GetService("Players")
local function alterPlayer(player)
local character = player.Character or player.CharacterAdded:Wait()
local humanoid = character:WaitForChild("Humanoid")
local userId = player.UserId
local humanoidDescription = game.Players:GetHumanoidDescriptionFromUserId(userId)
humanoidDescription.HeadColor = Color3.fromHex("#39FF14")
humanoidDescription.LeftArmColor = Color3.fromHex("#39FF14")
humanoidDescription.RightArmColor = Color3.fromHex("#39FF14")
humanoidDescription.TorsoColor = Color3.fromHex("#39FF14")
humanoidDescription.LeftLegColor = Color3.fromHex("#39FF14")
humanoidDescription.RightLegColor = Color3.fromHex("#39FF14")
if humanoid then
humanoid:ApplyDescription(humanoidDescription)
end
end
local function onPlayerAdded(player)
player.CharacterAdded:Connect(function(character)
alterPlayer(player)
end)
end
Players.PlayerAdded:Connect(onPlayerAdded)
 

Roblox Development Links

I’m laid up in the hospital right now with a broken femur (skydiving accident) and I’m trying to teach myself a little Roblox development. Roblox’s website has tons of great resources, but I don’t think it’s all that well organized. So I just wanted to write this really quick blog post to jot down the links that I have for getting started with Roblox development. Here are my links so far (will update as I learn more):

Roblox Docs (Use Slide Out Hamburger Menu): https://create.roblox.com/docs

Docs > Engine > Guides: https://create.roblox.com/docs/platform

Docs > Engine > Tutorials: https://create.roblox.com/docs/tutorials

Docs > Engine > Reference: https://create.roblox.com/docs/reference/engine

Docs > Engine > Resources: https://create.roblox.com/docs/samples

Docs > Engine > Art: https://create.roblox.com/docs/art/modeling

Docs > Engine > Design: https://create.roblox.com/docs/production/game-design

Tutorials[Core]: https://create.roblox.com/docs/tutorials/core

Tutorials[Environmental Art]: https://create.roblox.com/docs/tutorials/environmental-art

Docs > Engine > Guides > Coding Fundamentals: https://create.roblox.com/docs/tutorials/fundamentals/coding-1/coding-fundamentals

And last, there is “Introduction to Scripting.” This is the best part of the docs in my opinion for learning how to build real Roblox games that use code. I had a hard time rediscovering this section, but here’s the link: https://create.roblox.com/docs/tutorials/scripting/basic-scripting/intro-to-scripting


SuperInvest Privacy Policy

SuperInvest does not collect any user information. However, in the future we will track certain events users take in order to gain insights into our product and make improvements for user experience. All data will be anonymized.


Deploying Flask Apps to Production Linux Servers using Gunicorn and Nginx

This is is going to be a super short post that I’m really just writing for my own personal reference. The old guides that I used to use to setup my linux virtual machines for my flask apps keep giving me problems, so the purpose of this post is to jot down how to do this in the future the next time I need to do this.

First, reference this blog post: Deploy Flask The Easy Way With Gunicorn and Nginx!

What I like about this particular blog post is it skips all of the complicated pain in the @$$ steps like setting up non-root users and whatnot. I think using root is fine for small projects.

Last, the most critical thing is to make sure you install gunicorn into your virtual environment. When you do this, make sure to set the –ignore-installed flag so that gunicorn gets installed into the virtual environment. I believe this is the missing step from the previous guides I used to use which kept causing my setups to fail.

(venv) $ pip install --ignore-installed gunicorn

If you are installing from requirements.txt, also make sure to set the –ignore-installed flag so that gunicorn gets installed into your virtual environment instead of somewhere else:

(venv) $ pip install --ignore-installed -r requirements.txt