This blog post is brought to you by the developer of BitBudget. BitBudget is an automated budgeting app for Android and iOS which syncs with your bank account and helps you avoid overspending. If you’d like to quit living paycheck-to-paycheck and get a better handle on your finances, download it today! https://bitbudget.io
Hello internet friend. Welcome to my blog. This post actually isn’t for you, it’s for me! A lot of times I like to use this site to bookmark things I want to remember, so that’s sort of the purpose of this post. However, maybe you might find this helpful as a reference. So without further ado, I present:
My Super Sweet MySQL Quickstart Guide
Step 1: Spin up a MySQL server droplet
Make sure to use the MySQL droplet image available on the DigitalOcean marketplace. You could also use DigitalOcean’s managed database product, but it’s more expensive. Please note that this guide does not cover how to get up and running with the managed database product as the steps are different.
Step 2: Log in to your server from the command line using the password you created when spinning up your MySQL droplet
$ ssh root@123.45.67.891
Step 3: Look up your MySQL root password
$ nano /root/.digitalocean_password
You should find a file that contains your root MySQL password, your admin MySQL password, and your app MySQL password. The file will look something like this:
root_mysql_pass="234g234jhg23jh4hg34hg3h4g3hg4h3" admin_mysql_pass="5k56kj56k5g4g4jh54j3jhdkk3jj3j" app_mysql_pass="sdytsydtfshdffhsdhh2342323423423"
NOTE: You won’t actually be using any of the three passwords above, as we are going to create a new database user below in the next step. However, it’s still nice to have.
Step 4: Create a new MySQL user from the command line
$ sudo mysql -u root
CREATE USER 'dba'@'localhost' IDENTIFIED BY 'P@$$w0rD!';
CREATE USER 'dba'@'%' IDENTIFIED BY 'P@$$w0rD!';
GRANT ALL PRIVILEGES ON *.* TO 'dba'@'localhost';
GRANT ALL PRIVILEGES ON *.* TO 'dba'@'%';
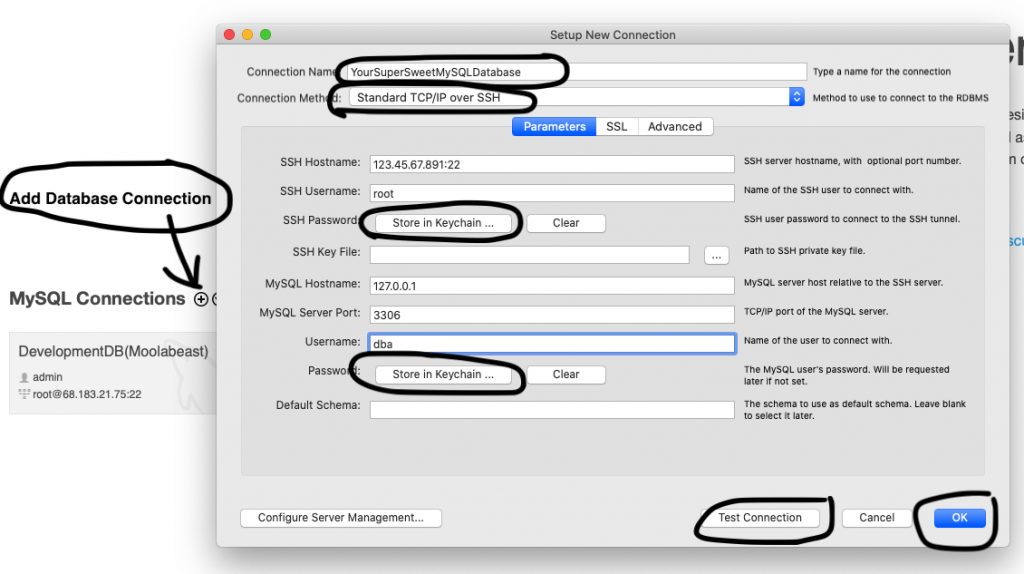
Step 5: Create a new database connection in MySQL Workbench (or DBeaver) so you can connect to your database using a desktop application with a graphical user interface (gui)
If you are using MySQL Workbench to administer your database, this screenshot demonstrates what information you need to enter to log in to your newly created MySQL database using the MySQL Workbench GUI software. Remember to click the ‘save in keychain’ button to enter your passwords. Use the ‘Test Connection’ button to test the database connection, and once you get a good test connection, press ‘OK’ to log in:
If you’re using DBeaver:
- Click “Database”
- Click “New Database Connection”
- Select MySQL
Then fill in the fields with the appropriate information.
On the ‘General’ Tab, enter:
- Server Host: localhost
- Port: 3306
- Database: LEAVE BLANK
- Username: dba
- Password: ENTER dba PASSWORD CREATED IN STEP 4
On the ‘SSH’ Tab:
- Check the ‘Use SSH Tunnel’ box
- Host/IP: ENTER IP ADDRESS FOR MYSQL DROPLET
- Port: 22
- Username: root
- Password: ENTER YOUR NEW SERVER DROPLET PASSWORD THAT YOU CREATED WHEN SPINNING UP YOUR MYSQL SERVER DROPLET
Click ‘Test Connection’
Click ‘Finish’ to Log In
Right click ‘MYSQL LOCALHOST’ and then click ‘RENAME’ to give your MySQL database a more descriptive name in the DBeaver GUI application