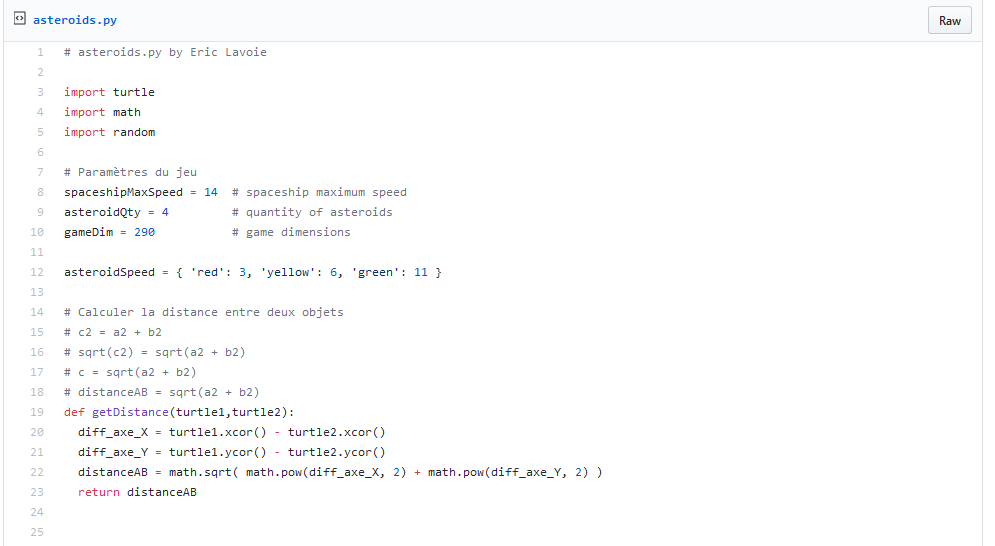
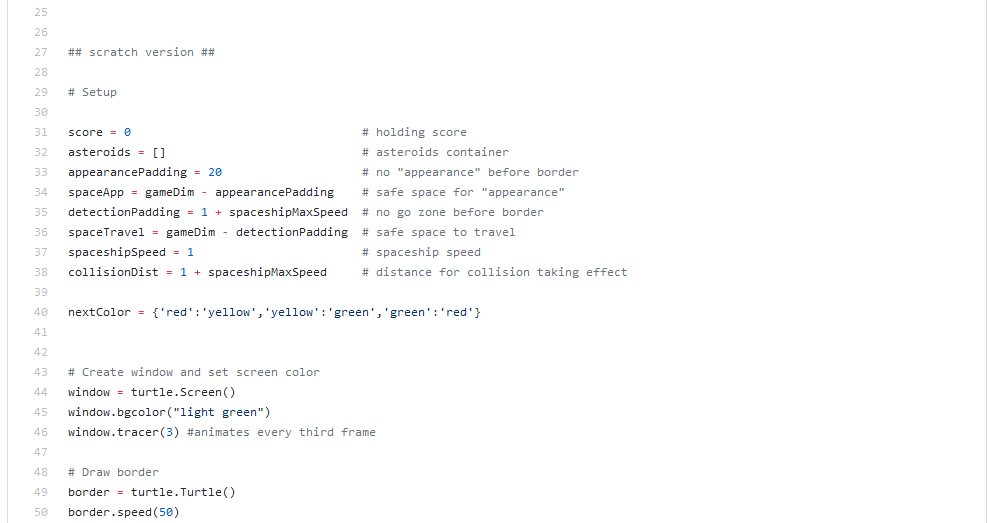
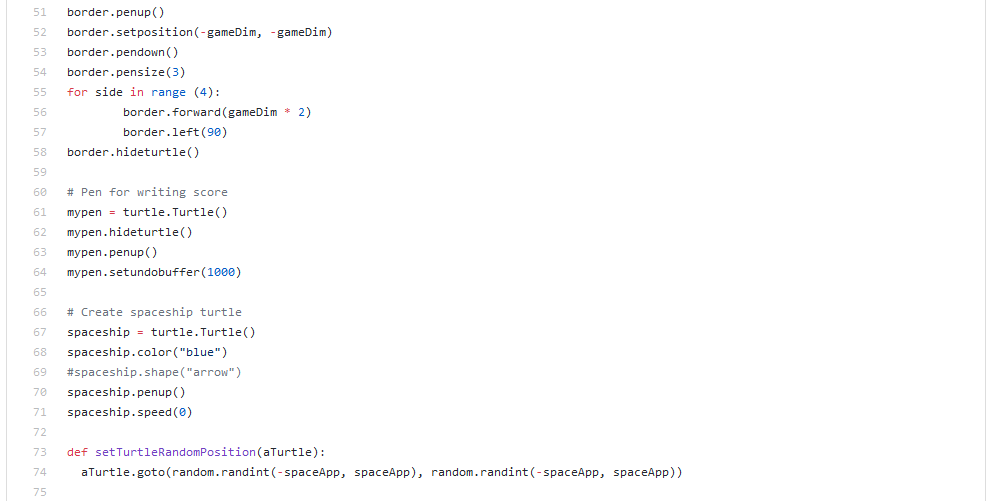
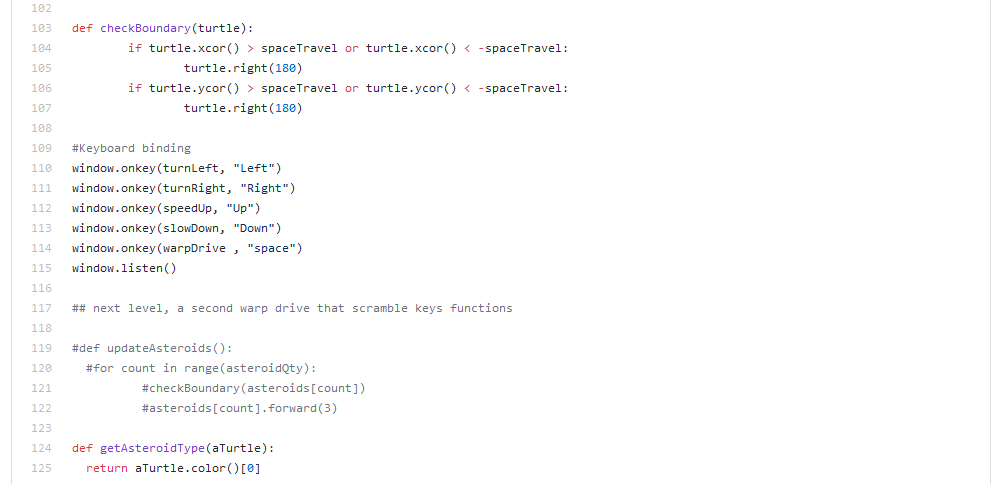
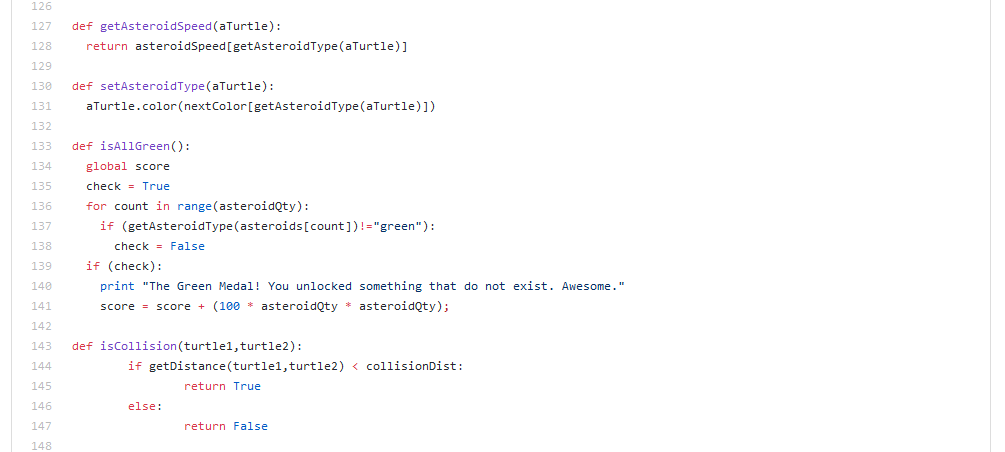
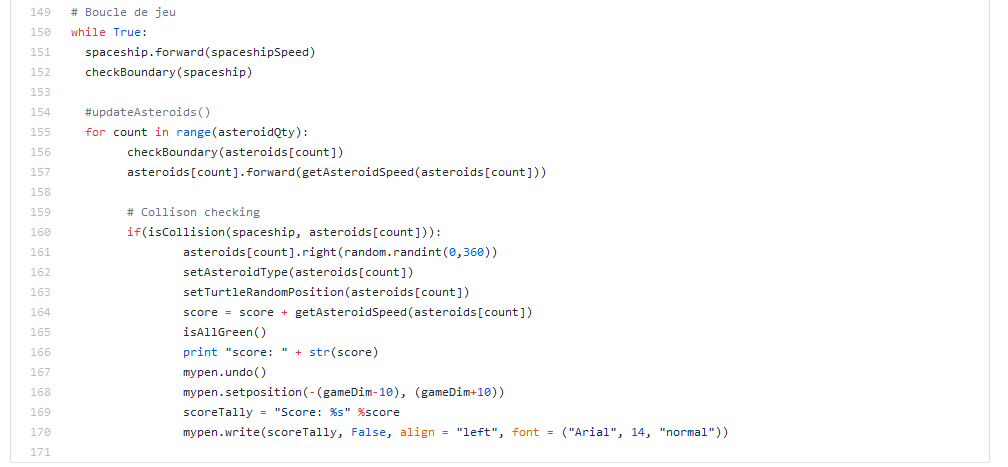
Asteroids Tutorial (for my Python Code Class Students)

This blog post is brought to you by the developer of BitBudget. BitBudget is an automated budgeting app for Android and iOS which syncs with your bank account and helps you avoid overspending. If you’d like to quit living paycheck-to-paycheck and get a better handle on your finances, download it today! https://bitbudget.io

Asteroids written in Python using the Turtle Graphics Library by Eric Lavoie


AttributeError: type object ‘datetime.time’ has no attribute ‘time’

This blog post is brought to you by the developer of BitBudget. BitBudget is an automated budgeting app for Android and iOS which syncs with your bank account and helps you avoid overspending. If you’d like to quit living paycheck-to-paycheck and get a better handle on your finances, download it today! https://bitbudget.io

Happened to run across a very annoying error attempting to generate timestamps tonight in Python. Apparently, the modules datetime and time can conflict with each other so that time.time() will not work if you are also importing the datetime module. I had some suspicion that the bug was due to some sort of bug related to using both datetime and time, but I wasn’t actually the person that figured this out, some wonderful man(woman?) on StackOverflow was! However, I wanted to jot this solution down here on the blog to make sure it is as easy to find as possible– Instead of importing time, import time under an alias such as time_:

# REFERENCE: https://bit.ly/2Gpmoy7
import time as time_
timestamp = int(time_.time())


SendGrid, Error Sending First eMail using Python– AttributeError: ‘TypeError’ object has no attribute ‘message’

This blog post is brought to you by the developer of BitBudget. BitBudget is an automated budgeting app for Android and iOS which syncs with your bank account and helps you avoid overspending. If you’d like to quit living paycheck-to-paycheck and get a better handle on your finances, download it today! https://bitbudget.io

Just wanted to post a quick remedy/solution to an annoying bug I recently encountered getting started with SendGrid using their Python Library. The error message I received following their quickstart guide went something like…

AttributeError: ‘TypeError’ object has no attribute ‘message’

Okay, so here’s what I figured out. There are two things probably going on here if you are encountering this error and can’t figure out what the problem is. First, you need to remember that your first SendGrid emails are likely going to end up in your Spam folder! Especially when using Gmail. So make sure you check your spam folder as there is a good chance your emails have actually been sending despite the error message.

Second, there appears to be a bug in the try-except block posted in the official SendGrid Quickstart Guide for Python. The solution is to simply comment-out/disable the response and error message code. Here is what the quickstart guide should look like with the buggy parts commented-out:

 
# using SendGrid's Python Library
# https://github.com/sendgrid/sendgrid-python
import os
from sendgrid import SendGridAPIClient
from sendgrid.helpers.mail import Mail

message = Mail(
    from_email='from_email@example.com',
    to_emails='to@example.com',
    subject='Sending with Twilio SendGrid is Fun',
    html_content='<strong>and easy to do anywhere, even with Python</strong>')
try:
    sg = SendGridAPIClient(os.environ.get('SENDGRID_API_KEY'))
    response = sg.send(message)
    # Comment out the response, and print something else instead
    # print(response.status_code)
    # print(response.body)
    # print(response.headers)
    # print('SUCCESS!')
except Exception as e:
    # Comment out the e.message, and print something else instead
    # print(e.message)
    print("ERROR: PC LOAD LETTER") # Cryptic Error Message

PLEASE NOTE, the WordPress plugin which I’m currently using to post code snippets here on the blog has some issues so the line numbers and what not appear to be off on the example above. Will need to look for a better solution here in the future. Maybe Github Gist Embeds?


Beating the Apple Card to Market: MoneyPhone Launching Memorial Day 2019

This blog post is brought to you by the developer of BitBudget. BitBudget is an automated budgeting app for Android and iOS which syncs with your bank account and helps you avoid overspending. If you’d like to quit living paycheck-to-paycheck and get a better handle on your finances, download it today! https://bitbudget.io

On March 12th 2019 I began working on my latest project, MoneyPhone, a personal finance app that monitors your spending habits to help you save money. Two weeks later on March 25th I woke up to discover (while surfing YouTube) that Apple Inc. has been working on essentially the exact same app— Apple Card. At first I was a little bit upset by the news, but now it’s actually got me fired up. If one of the most valuable companies in the world happens to be working on the same app idea that I’m working on, it must be a good idea right?

Apple has announced that Apple Card will be launching this Summer, however, I just wanted to take the opportunity to announce here on my blog that I plan on beating Apple to market– launching MoneyPhone by Memorial Day (May 27th, 2019)! Watch out Apple, under-employed millennial in his parent’s basement is coming for you 😉


Creating Secret Keys in Python for use with the Flask Web Framework

This blog post is brought to you by the developer of BitBudget. BitBudget is an automated budgeting app for Android and iOS which syncs with your bank account and helps you avoid overspending. If you’d like to quit living paycheck-to-paycheck and get a better handle on your finances, download it today! https://bitbudget.io

Working on a little web-dev project this afternoon and am diving into sessions for the first time with Python and Flask. Apparently when working with sessions in Flask you need to create a secret_key comprised of random bytes represented in hexadecimal. I’m sort of a high-level guy myself and am not used to working with bits, bytes, hexadecimal and whatnot, so I had to do a little googling to get up to speed and wanted to share what I learned here on the blog.

According to the official Flask documentation, you create your secret_key by assigning it a string value with this funky letter ‘b’ prefixed in front of your string literal:


# Set the secret key to some random bytes. 
# Keep this really secret!
app.secret_key = b'_5#y2L"F4Q8z\n\xec]/'

Okay, so how do you go about creating this hexadecimal code? I suggest heading over to repl.it and simply entering the following Python 3 code from my github gists to generate your hexadecimal:

topherPedersen’s Hexadecimal Conversion Tool

Generating Random Bytes in Hexadecimal


# TODO: Learn Docker

I’ve been having a lot of trouble over the past few days messing around with deploying my latest Flask application from my development environment, a Windows 10 machine, over to an Ubuntu Virtual Server running Apache on DigitalOcean. It seems like there must be a solution for all of this pain… Docker maybe? Also, another loosely related solution I’m considering is moving my MySQL database over to it’s own server? I don’t really know. One of the things I really liked about PHP was doing all of my development on an actual live virtual server, so I never really had to mess with moving my application from a local development machine over to live production server. It seems like Docker might be able to solve this problem so I think I ought to check it out here in the near future.

Docker tutorials for future reference:

Dockerize Simple Flask App

Dockerize your Flask Application


Notes on Deploying a Production Flask App to an Ubuntu Virtual Server Running Apache2 on DigitalOcean

Unfortunately I broke my Linux/Apache/MySQL/Python-Flask app last night. I simply wanted to change the name of the directories from FlaskApp to the name of my latest project, and also wanted to change the main python file from flaskapp.py to something more like my_latest_project.py. I figured this would be fairly easy, just change the Apache configuration file, restart Apache, and I should be good to go. Well, I was wrong! And now everything is broken and I either need to spin up and configure a new virtual server instance, or accept the file structure and naming conventions of the generic server image that I already have. So I just wanted to bookmark a few blog posts here for my own personal reference regarding setting up Python/Flask on an Ubuntu Virtual Server running Apache:

How To Deploy a Flask Application on an Ubuntu VPS

mod_wsgi (Apache)


How to Reload Source Code Changes for your Flask Project Running on a Production Apache Web Server the Easy Way

Want to reload your source code changes on your Flask project running on a production Apache web server the easy way? Simply log in to your virtual server via ssh and “gracefully” restart your Apache2 web server:

$ apachectl -k graceful


Trouble Installing Your SSL Certificate (.pem) Purchased Through 101domain.com? Let’s Encrypt with Certbot!

This blog post is brought to you by the developer of BitBudget. BitBudget is an automated budgeting app for Android and iOS which syncs with your bank account and helps you avoid overspending. If you’d like to quit living paycheck-to-paycheck and get a better handle on your finances, download it today! https://bitbudget.io

I’ve been having a really hard time trying to install a simple SSL certificate on my DigitalOcean virtual server running Ubuntu 18 & Apache2. The certificate was purchased for $10 through 101domain.com and I think most of the frustration is coming from the fact that they issued me a .pem file instead of the .crt and .key files like which are used in essentially all of the tutorials on the subject (I’m sure that the .pem file would work, I just can’t figure out how to do it exactly). This has all been quite the headache here over the past two days. However, I think I may have found a solution!

It seems that there’s actually an organization called Let’s Encrypt that issues free SSL certificates. And the Electronic Frontier Foundation has apparently released a simple tool called Certbot that then automates the installation of these free SSL certificates issued by Let’s Encrypt. Pretty awesome right? So, I think I’m just going to forget about my $10 SSL certificate from 101domain.com, and just try setting everything up using Let’s Encrypt & Certbot instead.

NOTE: Remember to remove your CNAME record from your DNS records for your old 101domain.com SSL certificate, so you can re-do everything using the free SSL cert from Let’s Encrypt.

TUTORIAL: How To Secure Apache with Let’s Encrypt on Ubuntu 18.04

UPDATE: While I spent hours trying to figure out how to do this manually, I was able to fix everything and get up and running with HTTPS & SSL in 5 minutes using Certbot! If you happen to stumble upon this post, please reference the above tutorial on securing Apache with Let’s Encrypt. Also, if you happen to be using certbot to add HTTPS & SSL to your WordPress site, and you end up losing all of your styling (CSS), log in to your wp-admin page, then go to settings, and change your site’s domain name from http://yourdomain.com to https://yourdomain.com. Hope this post ends up helping some other poor soul desperately fumbling around with .pem files and Apache2 configuration… God bless Certbot and long live the Electronic Frontier Foundation and Let’s Encrypt!


How to Post Source Code on a WordPress Blog

Okay, so over the past few days I’ve been working on moving my blog over from WordPress.com to a virtual private server on DigitalOcean powered by the open source WordPress software. The reason behind the move is that I wanted to install a plugin for posting source code on my WordPress blog, something that was actually much harder than I would have ever thought. However, to install the necessary plugin, Automattic (the parent company of WordPress.com) wanted to increase my monthly plan from $4 a month to $25 a month! Pretty steep hike right?

Well I’m finally wrapping everything up with the move, and wanted to write this quick post to take my new SyntaxHighlighter Evolved WordPress plugin for a spin! Hint: if you don’t know what the SyntaxHighlighter Evolved plugin is, it’s what you need to install on your WordPress server to easily start posting source code on your blog:

<?php
    echo "<p>hello, world</p>";
?>