This isn’t going to be much of a blog post, but I just wanted to bookmark this helpful StackOverflow post on how to setup a WordPress blog which is hosted under a route, /blog, on my Flask site: Proxying to another webservice with Flask
The easy way to host a WordPress blog on a website powered by Flask, Node/Express, Ruby on Rails, etc etc is to simply host the WordPress blog on a subdomain such as blog.mysite.com. However, Google treats subdomains as separate websites! So this kind of defeats the purpose of adding a blog to your site to try and boost it’s SEO rankings. So…
I’m going to try following some of the ideas proposed on the link above and see if I can get this to work on my Flask site.
I’ve been running into a lot of strange SEO problem recently. Another issue is ReactJS and SEO. I’d really like to use React on my site, but I don’t think I can without hurting SEO. (I think React does offer a server side rendering option for this, but you have to use NodeJS instead of Flask). Anyway I’m getting kind of sleepy and rambling now. Goodnight.
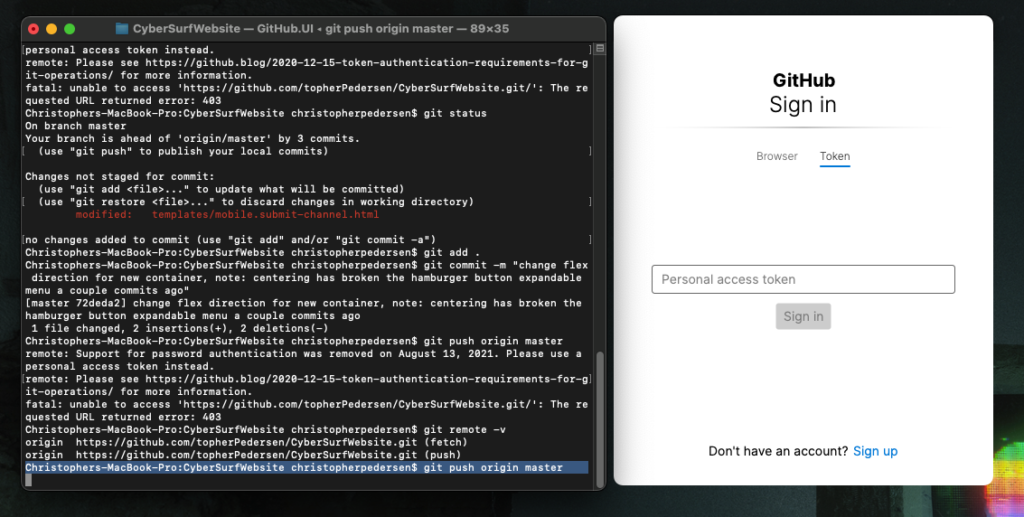
This is so stupid, and if you just googled “Support for password authentication was removed on August 13, 2021. Please use a personal access token instead.” I know you agree! Github literally just quit working 3 minutes ago because of their idiotic decision to drop support for passwords.
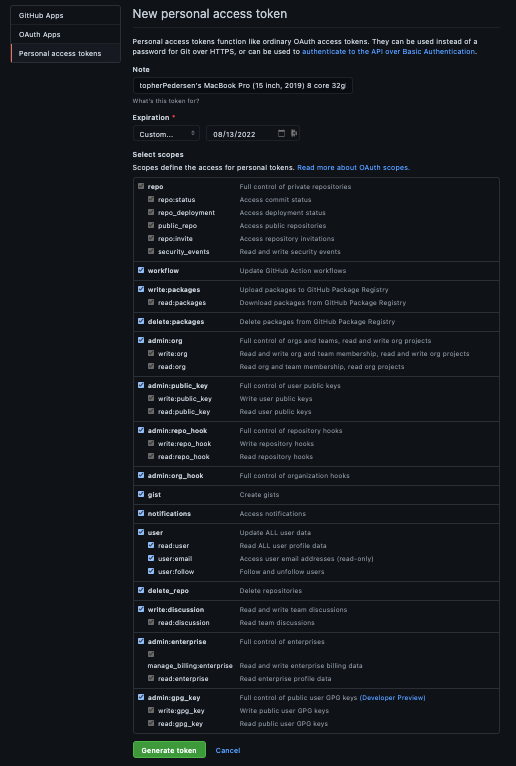
Okay so what now? I actually don’t know, but… I’m going to figure out how to add a personal access token and drop the instructions here in this blog post:
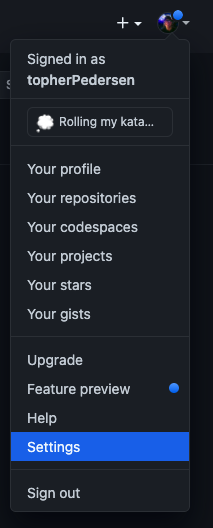
Step 1: Click Profile > Settings on Github.com
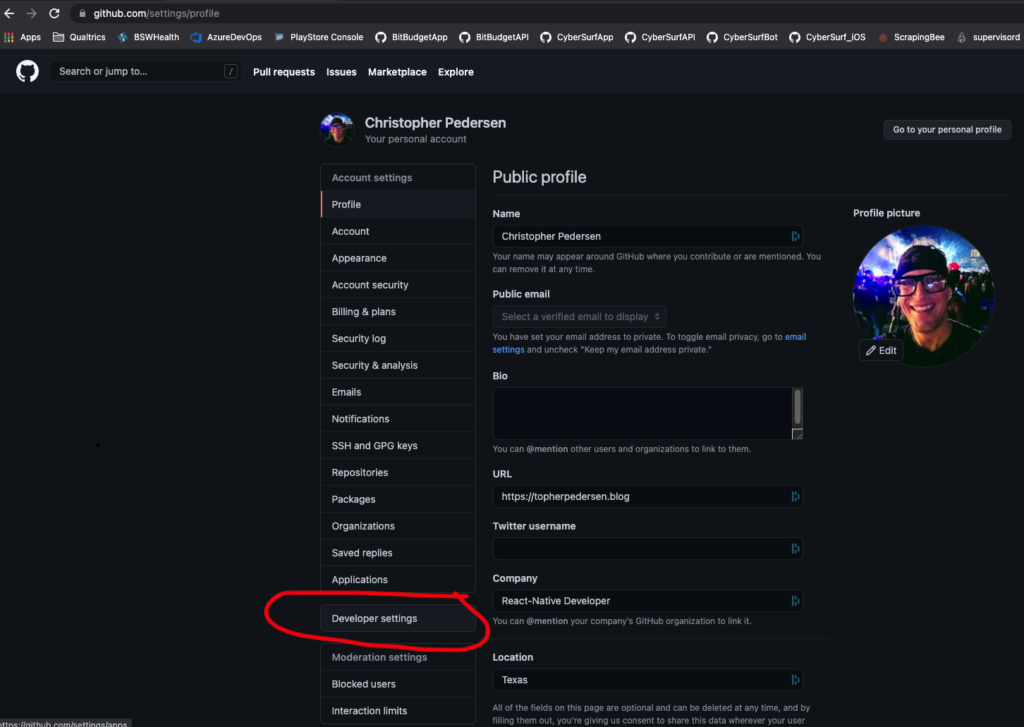
Step 2: Click the Developer Settings Option
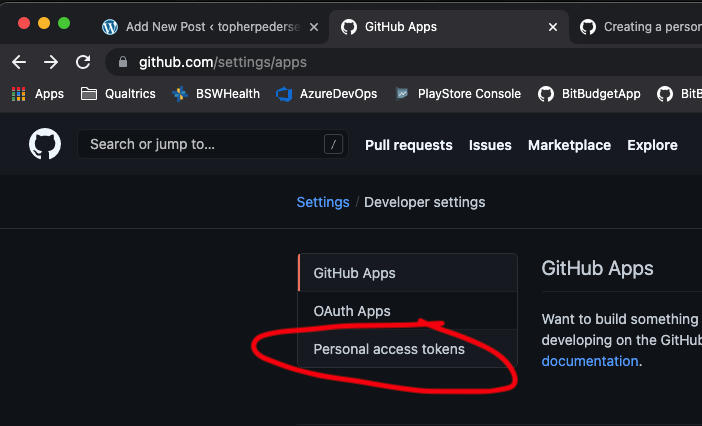
Step 3: Click Personal Access Tokens
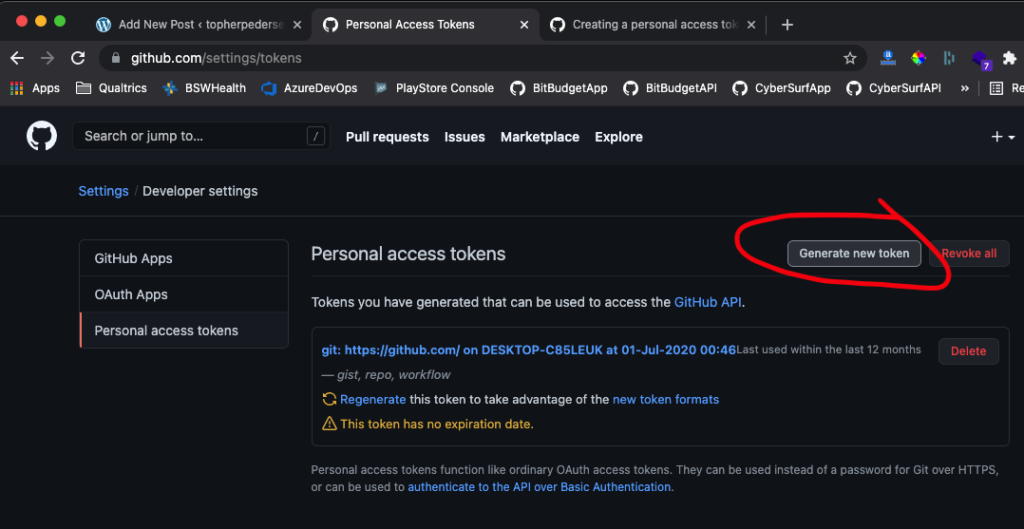
Step 4: Click Generate New Token
Step 5: Add Note, Set an Expiration Date, Select Scopes, Click Generate Token
Step 7: Copy and paste your new access token to a safe place like a password manager!
For this step I’m not including a picture just to make sure I don’t accidentally expose my access token. But it should be pretty obvious. Simply copy the access token, then paste it into your password manager (Dashlane, 1Password, or whatever other password manager you use). If you don’t have a password manager, I suggest now is a good time to get one. Also, if you’re wondering: what the hell is a personal access token? It’s just a fancy password, so that’s why I advise you keep in your new password manager.
Step 8: Run crazy terminal commands to install Microsoft’s Git Credential Helper
I know, I thought there would be a better option than this. However, it makes sense that since Microsoft owns Github now, they’ve essentially manufactured a new problem that must be solved by using one of their products. So yeah, that’s the next step– open the terminal app on your Mac and run these commands to install Microsoft’s Git Credential Helper:
$ brew tap microsoft/git
$ brew install --cask git-credential-manager-core
UPDATE (February 26th, 2022): I’ve noticed recently that I personally can’t install the credential manager on my M1 MacBook Pro anymore using brew. I run into an error which looks something like:
Error: Failure while executing; `/usr/bin/sudo -E — /usr/bin/env LOGNAME=christopherpedersen USER=christopherpedersen USERNAME=christopherpedersen /usr/sbin/installer -pkg /opt/homebrew/Caskroom/git-credential-manager-core/2.0.632.34631/gcmcore-osx-2.0.632.34631.pkg -target / -allowUntrusted` exited with 1. Here’s the output:
installer: Package name is Git Credential Manager
installer: Installing at base path /
installer: The install failed. (The Installer encountered an error that caused the installation to fail. Contact the software manufacturer for assistance. An error occurred while running scripts from the package “gcmcore-osx-2.0.632.34631.pkg”.)
If you run into this issue, instead of using brew download the macOS pkg from Github. However, don’t download the latest version as I believe there’s a bug in the latest version. I would recommend downloading:gcmcore-osx-2.0.498.54650.pkg
After you download the pkg file, go to Finder > Downloads and then right-click on the pkg file and select “Open with Installer” and finish the installation.
Next, you’ll need to open up a new terminal window and enter:
$ git-credential-manager-core configure
A window should pop up at some point after running that command where you’ll be able to paste your new Personal Access Token which is the last step in setting up the Git Credential Manager.
Step 9: Last, run $ git push and paste your Personal Access Token into the Microsoft Git Credential Popup Window
This last step is actually pretty simply: You just run $ git push like you normally would from your project directory, but now a popup window from the Microsoft Git Credential Helper will appear where you can paste your new Personal Access Token. And that’s it, you’re back in business my friend 🙂
Bonus Step: Adding Your New Github Personal Access Token to Your Ubuntu Linux Server
Okay so this last step I came back and added one day later after writing the above steps for Mac. The steps above don’t really work server-side. Supposedly Microsoft’s Credential Manager supports Linux but I couldn’t get it to work for me. So here are my five magic terminal commands to add your new personal access token to your Ubuntu Linux Server:
I don’t know exactly what the above gobbledygook means. Originally I thought “fbclid” might be shorthand for Facebook Client ID. This was my working hypothesis that maybe this was some sort-of new hacker exploit involving login with Facebook.
But a quick google search for ?fbclid= revealed that this actually stands for Facebook Click Identifier. I’m sort of a suspicious person, so my next thought jumped to: Is this some kind of new click fraud scheme?
However, now I think I have this mystery figured out: someone shared a link to my website on Facebook! Ding ding ding, we have a winner! So if you find yourself puzzled trying to figure out some strange traffic coming to yourself website with ?fbclid= in the URL, it’s probably a visitor coming to your site via Facebook.
SocialBlade.com is great. What a fantastic idea— a database of the World’s Top YouTube Channels where you can browse the rankings, see who’s rising, see who’s falling, who’s on top, discover new channels, et cetera, et cetera. Only problem? It costs money! While I’m not sure exactly how much SocialBlade costs, I know you really only get access to the Top 250 YouTube Channels, and well, that’s all you get!
But if you happen to be looking for a free alternative to SocialBlade’s database of top YouTube channels you are in luck, as I just finished launching the very first version of my new site CyberSurf.io about 5 minutes ago. If you are interested in taking a look at what I’ve got so far, please see my first post on the new site: The World’s Top 10,000 YouTube Channels
For a little back story regarding my project, this new website actually started out as an app for the Amazon Fire TV Stick that I built so I could channel surf YouTube; that’s how the whole thing got started. To build my Fire Stick app I incidentally needed to build a web crawler to discover new YouTube channels and crawl those channels for content which I featured in the app using YouTube’s shareable embeds. However, that project was quickly shut down by Amazon’s App Store which rejected the app over copyright issues. While I don’t believe I was actually in violation of copyright infringement as I simply used sharable YouTube embeds which you see all over the internet such as Facebook, Twitter, and Reddit, nevertheless, I didn’t have the resources to weather battling with Amazon’s App Store reviewers, so I simply decided to pivot to something else.
This new project I decided to call, CyberSurf. Several months ago I launched CyberSurf the mobile app but ran into some problems. Problem A: The Apple App Review Board rejected my app. Problem B: I couldn’t get anyone to download my Android app! In my opinion, the CyberSurf Android app is much better than my new website, cybersurf.io. However, I found trying to reach people and drive installs for the app was incredibly expensive and wasn’t getting any traction. Which is what brings me here now writing this blog post… I am fairly confident that a market and demand for YouTube channel rankings exists, and maybe, just maybe, a website featuring such a database will inevitably find its way to end users via Google searches. So if you happened to have read this far down my blog post, it looks like my hypothesis may be right.
Any comments, questions, feature requests for CyberSurf.io and my new YouTube Channel Rankings? Feel free to contact me (Topher Pedersen) at chris@topherpedersen.com, or shoot me a text message @ +1 (469) 261-0727.
While it’s currently fashionable in web development to use front-end frameworks such as Bootstrap to create “responsive” websites which can transform themselves entirely client-side to fit either a Desktop or mobile phone screen, sometimes it’s just easier to serve up a mobile or desktop version of your website depending on the user’s device. In this quick blog post I wanted share a quick snippet of Python/Flask code which you can use to serve up desktop and mobile versions of your website. In my opinion, this often makes more sense than trying to build some kind of transformer website. The transformer concept is kind of cool, and is definitely slick, it’s quite tedious and your end users probably won’t notice all of the effort you put into your responsive design anyway.
So without further ado: How to Serve Up a Mobile Friendly Version of your Website in Python with Flask
This file contains hidden or bidirectional Unicode text that may be interpreted or compiled differently than what appears below. To review, open the file in an editor that reveals hidden Unicode characters.
Learn more about bidirectional Unicode characters
Today I made my second post on the red hot subreddit r/wallstreetbets about my new position in Cash App parent company Square, Inc ($SQ). And just like my first post, it was taken down and deleted after 15 minutes. Having had my first post immediately deleted, this time I made sure to follow all of the subreddit’s community guidelines etc. However, the post was still taken down even though it followed all of the guidelines. Then I had a realization: The people who run WallStreetBets don’t want people posting about good companies with strong prospects. WallStreetBets is simply a vehicle for a select few to pump and dump garbage stocks like GameStop ($GME) and Blackberry ($BB) which are going to $0.
So here’s how the scheme works: The moderators on r/wallstreetbets identify bad companies with poor prospects, purchase options for cheap on these companies, then relentlessly pump these companies on their r/wallstreetbets subreddit. Think about it, you can’t buy options for cheap on good companies with strong prospects such as Square. You can only buy options on the cheap for trash companies like GameStop and Blackberry.
Anyway, that’s my rant for the day. Maybe everyone already knew this, but this was sort-of a big awakening moment for myself. I was experiencing quite a bit of FOMO recently about wallstreetbets and really wanted to get in on the action. But now I know the truth: r/wallstreetbets is just a pump and dump scheme, and their moderators only want suckers piling into shit. It is not a place for legitimate investors making legitimate investments.
UPDATE (June 11th, 2021, 1:56PM): I could be wrong about WallStreetBets. I posted a similar post on r/investing and it was immediately removed as well. It could be that Reddit in general is highly manipulated by moderators who decide who is allowed to post and which posts will be pushed to the top. I know that r/bitcoin was notorious for censoring people back in 2017/2018 during the great block size wars, so maybe Reddit in general kind of sucks.
Today at work I was asked to re-factor some code in our organization’s app that involved replacing a bunch of strings with nested enums. For example, we have a bunch of strings that look something like “ActivityCode.Foo.A” and one of the tech leads wanted me to replace all of these strings with enums. However, you can see from my example string that it isn’t formatted like an enum. An enum would look something like ActivityCode.Foo. But how do you write ActivityCode.Foo.A where there is some nesting going on? The tech lead specifically requested that I use an enum, not an object, which brings us to this blog post: How do you create a nested enum in TypeScript?
Well, the short answer is: You can’t create nested enums in TypeScript.
However, there is a little hack you can use where you can create an object (ActivityCode), which contains a bunch of enums and essentially achieve the same effect. So if you need to write something like ActivityCode.Foo.A using enums, you can write something like:
This file contains hidden or bidirectional Unicode text that may be interpreted or compiled differently than what appears below. To review, open the file in an editor that reveals hidden Unicode characters.
Learn more about bidirectional Unicode characters
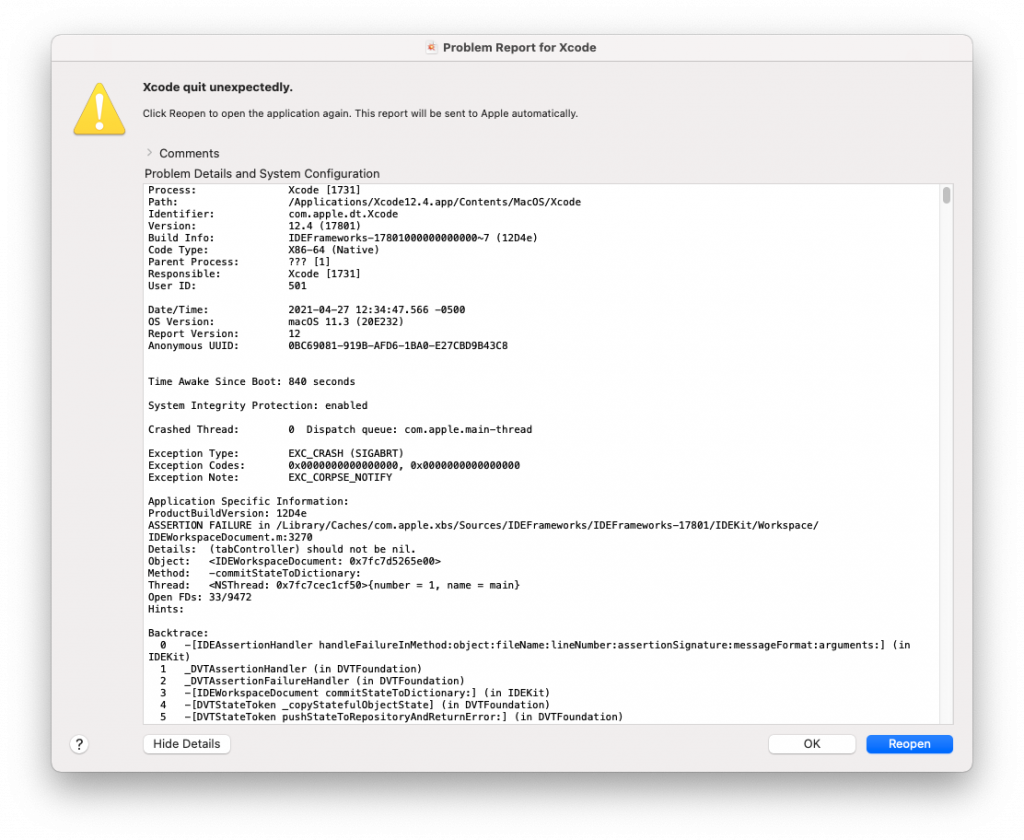
Xcode quit unexpectedly. Click Reopen to open the application again. This report will be sent to Apple automatically…
Oh boy! So Xcode is refusing to open your project and keeps crashing over and over again everytime you try to open your workspace. Well you’ve come to the right place.
For me, this issue started happening on my machine when attempting to open two different versions of the same app located in different directories. However, I’m unsure on what the cause of this issue is, and I’m sure lots of people likely run into this issue for all sorts of different reasons. Maybe you received an error dialog like the one shown above, or maybe Xcode simply doesn’t respond at all when you try to open your project. Regardless, here’s the quick fix you need that was passed down to myself by one of my co-workers:
Instead of trying to open your workspace/project with Xcode, open up your project’s directory using your Mac’s Finder application, then just double click on your app’s .xcodeproj file or .xcworkspace file depending on what you normally open. And that’s it! Sort of silly, but this trick is absolutely essential! So if you find yourself in a situation where Xcode doesn’t want to open your project, open it with Finder instead, and you’ll be back in business in no time.
Last week after work I was working on one of my side projects, and wanted to install Redux into a new app I’m working on which is using Wix’s React Native Navigation. However, I quickly realized that the old Redux boiler plate code that I normally use for my React Navigation based apps (not to be confused React Native Navigation from Wix) wasn’t going to work. I assumed that React Native Navigation would have a section about Redux on their site, but I wasn’t able to find anything. In fact, I actually wasn’t able to get installed in my after work coding session and pushed this work off to the weekend, which brings me here to you now writing this blog post!
Okay so here is what I’ve found: React Native Navigation used to have a helper function called registerComponentWithRedux that you could use. Unfortunately this function has since been deprecated. But the good news is, the Wix team left an excellent comment in their source code with instructions on how to install Redux into your React Native Navigation app:
registerComponentWithRedux is deprecated and will be removed in the next version! Please use Navigation.registerComponent instead. Visit the docs for more information https://wix.github.io/react-native-navigation/api/component#registering-a-component-wrapped-with-providers
Then if you head on over to the React Native Navigation docs you can check out the section on Registering a component wrapped with Providers. The code snippet they provide demonstrating how to do this looks something like:
// Source Code by Wix Published into the Public Domain
import { Provider } from 'react-redux';
const store = createStore();

Navigation.registerComponent(`navigation.playground.MyScreen`, () => (props) =>
  <Provider store={store}>
    <MyScreen {...props} />
  </Provider>,
  () => MyScreen)
);
Boom! There you have it. Simply wrap your screens with Redux s in your registerComponent declarations and you’re good to go. Then I assume you just need to make sure to pass the same store to all of your screens which you are registering, and your Redux store should be available all throughout your app.
Today I happen to be taking another stab at experimenting with External Component’s for my organization’s React Native Navigation app, and I found myself digging through my GitHub repos for the working example app I created demonstrating how to add External Component’s to a React Native Navigation app. So I thought maybe I should write up a quick blog post on the topic for my own personal reference or to possibly help someone else out there trying to figure this out.
First, I must say that I didn’t actually write this example app! For the most part, the code all comes from Wix’s “playground” app contained in the main React Native Navigation GitHub repo. However, I found that Wix’s documentation for how to add External Component’s wasn’t really all that helpful, and I couldn’t get the actual “playground” app to compile on my machine. Thus the need for this blog post and my example app.
So pretty much what I have is a fairly bare React-Native app that I created using react-native init. Then, I referenced Wix’s “playground” app’s source code and added the logic to my example app. This was how I was able to get all of this to work. So if you also are having a hard time getting External Component’s to work by referencing the docs, and also can’t get the playground app to compile, check out my example app on GitHub: RNNExternalComponentApp
UPDATE (Friday August 5th, 2022): I had to do this again today for work, but this time I needed to be able to register the external component using Swift. If you need to do this using Swift, you can create an Objective-C function and then export it back to Swift if you need to register an external component from Swift. Here is my HOW TO on doing this:
I figured out how to do this. Instead of converting the code snippet from Objective-C to Swift, you can wrap the code snippet in your own Objective-C function, then export that function back to Swift. In case anyone else runs into this issue, here is my code:
In your bridging header (yourapp-Bridging-Header):
This file contains hidden or bidirectional Unicode text that may be interpreted or compiled differently than what appears below. To review, open the file in an editor that reveals hidden Unicode characters.
Learn more about bidirectional Unicode characters
This file contains hidden or bidirectional Unicode text that may be interpreted or compiled differently than what appears below. To review, open the file in an editor that reveals hidden Unicode characters.
Learn more about bidirectional Unicode characters
This file contains hidden or bidirectional Unicode text that may be interpreted or compiled differently than what appears below. To review, open the file in an editor that reveals hidden Unicode characters.
Learn more about bidirectional Unicode characters
This file contains hidden or bidirectional Unicode text that may be interpreted or compiled differently than what appears below. To review, open the file in an editor that reveals hidden Unicode characters.
Learn more about bidirectional Unicode characters