Need help with anything related to the BitBudget mobile app for iOS or Android? Contact me!
Founder, Developer, and Customer Support Rep: Christopher Pedersen
Phone Number: +1 (469) 261-0727
Email: chris@topherpedersen.com
Need help with anything related to the BitBudget mobile app for iOS or Android? Contact me!
Founder, Developer, and Customer Support Rep: Christopher Pedersen
Phone Number: +1 (469) 261-0727
Email: chris@topherpedersen.com
This blog post is brought to you by the developer of BitBudget. BitBudget is an automated budgeting app for Android and iOS which syncs with your bank account and helps you avoid overspending. If you’d like to quit living paycheck-to-paycheck and get a better handle on your finances, download it today! https://bitbudget.io
Hello internet friend. Welcome to my blog. This post actually isn’t for you, it’s for me! A lot of times I like to use this site to bookmark things I want to remember, so that’s sort of the purpose of this post. However, maybe you might find this helpful as a reference. So without further ado, I present:
Make sure to use the MySQL droplet image available on the DigitalOcean marketplace. You could also use DigitalOcean’s managed database product, but it’s more expensive. Please note that this guide does not cover how to get up and running with the managed database product as the steps are different.
$ ssh root@123.45.67.891
$ nano /root/.digitalocean_password
You should find a file that contains your root MySQL password, your admin MySQL password, and your app MySQL password. The file will look something like this:
root_mysql_pass="234g234jhg23jh4hg34hg3h4g3hg4h3" admin_mysql_pass="5k56kj56k5g4g4jh54j3jhdkk3jj3j" app_mysql_pass="sdytsydtfshdffhsdhh2342323423423"
NOTE: You won’t actually be using any of the three passwords above, as we are going to create a new database user below in the next step. However, it’s still nice to have.
$ sudo mysql -u root
CREATE USER 'dba'@'localhost' IDENTIFIED BY 'P@$$w0rD!';
CREATE USER 'dba'@'%' IDENTIFIED BY 'P@$$w0rD!';
GRANT ALL PRIVILEGES ON *.* TO 'dba'@'localhost';
GRANT ALL PRIVILEGES ON *.* TO 'dba'@'%';
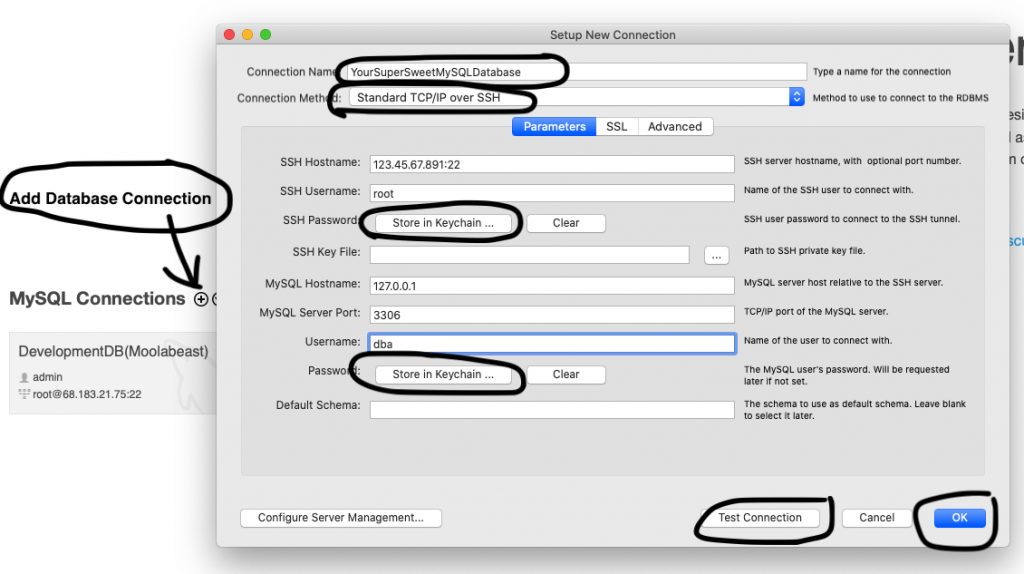
If you are using MySQL Workbench to administer your database, this screenshot demonstrates what information you need to enter to log in to your newly created MySQL database using the MySQL Workbench GUI software. Remember to click the ‘save in keychain’ button to enter your passwords. Use the ‘Test Connection’ button to test the database connection, and once you get a good test connection, press ‘OK’ to log in:
If you’re using DBeaver:
Then fill in the fields with the appropriate information.
On the ‘General’ Tab, enter:
On the ‘SSH’ Tab:
Click ‘Test Connection’
Click ‘Finish’ to Log In
Right click ‘MYSQL LOCALHOST’ and then click ‘RENAME’ to give your MySQL database a more descriptive name in the DBeaver GUI application
This blog post is brought to you by the developer of BitBudget. BitBudget is an automated budgeting app for Android and iOS which syncs with your bank account and helps you avoid overspending. If you’d like to quit living paycheck-to-paycheck and get a better handle on your finances, download it today! https://bitbudget.io
Well hello there internet friend. Having trouble getting your Flask app up and running in production? This can be quite the pain! In the past I’ve used Apache2 and mod_wsgi to serve my Flask apps, but getting it all setup tends to be a serious headache. It doesn’t help that the official docs on the Flask website are pretty thin, and don’t really list all of the steps you need to get everything working. Furthermore, a lot of the blog posts on the topic of Apache2, mod_wsgi, and Flask don’t always work either.
And that’s what brings me here to WordPress tonight to write this blog post. I’m currently working on pushing a new project to production, and well… I can’t seem to get Apache to play nice with my Flask app! (even though I’ve already done this before in the past). And I’m not sure exactly what’s causing my issues. Is it the switch from Ubuntu 16 to Ubuntu 18? The newest version of Apache2 doesn’t work with the old configuration file? I just don’t know. All I do know is: there has to be a better way!
So after several hours of fumbling around with Apache, I decided that most of the people in the Flask community probably aren’t using Apache, so maybe a good first step would be to try and pick a more common setup: Gunicorn + NGINX.
If you happen to have stumbled upon this blog post trying to get Apache and mod_wsgi to work with Flask, I suggest you simply ditch Apache and use Gunicorn + NGINX instead. Specifically, I recommend you follow along with this excellent tutorial which I just discovered from DigitalOcean: How To Serve Flask Applications with Gunicorn and Nginx on Ubuntu 18.04
In fact, the real purpose of this blog post is that I want to bookmark that tutorial so I don’t lose it! The guide is from the people at DigitalOcean, but the steps described should work with any Linux Virtual Server. But before you get started following that guide, there are a few prerequisites steps:
But before following along with the DigitalOcean guide above, please note that there may be an error in the guide related to the myproject.service file that you’ll be instructed to create. For me, gunicorn doesn’t seem to install into my python virtual environment so I had to install it globally:
$ sudo apt install gunicorn
And then change ExecStart line in myproject.service to:
ExecStart=gunicorn --workers 3 --bind unix:myproject.sock -m 007 wsgi:app
And one last note, towards the end of the guide above you are going to need to specify how many worker processes you want serving up your Flask app. I had absolutely no idea how many to specify as this was not something I had to worry about in the past when setting up Apache and Flask. According to gunicorn’s documentation a rule of thumb is (2 * numberOfServerCores) + 1. So if that part of the guide sticks out when you get to it, go ahead and use that rule of thumb for estimating how many worker processes you want to provision. And that’s it!
I know it’s a lot of steps to get all of this up and running. But I do think that the guide I’ve bookmarked here in this post is the best I’ve found. However, if you don’t have any experience with Linux and some of this stuff is over your head, there are other options. But if you’re like me and you do have a fair amount of experience with that kind of stuff, but are just stuck getting Apache configured, ditch Apache/mod_wsgi and go with Gunicorn/NGINX.
UPDATE (June 1st, 2020): One thing I forgot to mention is how to get Gunicorn and NGINX to reload changes that you make to your source code. If you push a new version of your app to the server, you can use the following command(s) to make sure the changes are served:
Restart Gunicorn
$ sudo systemctl restart myproject
Restart NGINX (if necessary)
$ sudo systemctl restart nginx
Please note that the name “myproject” is what the authors of the tutorial mentioned above called their project in the example, so for consistency I’ve used the same name. Replace ‘myproject’ with whatever project name you chose while following along with the DigitalOcean tutorial.
UPDATE (More Notes to Self): If you need to install dependencies on the production server and are using a virtual environment as described in the tutorial, log into the server using SSH as a non-root user, navigate to your project directory, activate the virtual environment, and then install your dependencies:
$ cd ~/myproject
$ source myprojectenv/bin/activate
(myprojectenv) $ pip install supersweetlib.py
Or if you have a requirements.txt file…
(myprojectenv) $ pip install -r requirements.txt
UPDATE (April 17th, 2022): The last time I tried deploying a production flask app using the steps described in this blog post along with the DigitalOcean guide, I kept running into a bunch of problems with gunicorn. It looks like my issue was the gunicorn was not actually getting installed into my virtual environment so the ExecStart command in myprojectname.service was never able to actually start up gunicorn. To fix this issue, when you install gunicorn in your virtual environment make sure to use the -I (that’s a capital i, not a lowercase L) or –ignore-installed flag to ensure that gunicorn actually gets installed into your virtual environment:
(venv) $ pip install -I gunicorn
This blog post is brought to you by the developer of BitBudget. BitBudget is an automated budgeting app for Android and iOS which syncs with your bank account and helps you avoid overspending. If you’d like to quit living paycheck-to-paycheck and get a better handle on your finances, download it today! https://bitbudget.io
Using the autoFocus prop with TextInputs in React-Native is normally straightforward. However, I’ve noticed that attempting to autoFocus TextInput fields contained within the simple <Modal/> component that comes with React-Native, or the 3rd party react-native-modal doesn’t seem to work. I think the problem likely has to do with how the <Modal/> component is designed. You typically embed the <Modal/> on a screen and just toggle the value of a prop whenever you want to show or hide it. And for whatever reason, this doesn’t seem to play well with autoFocus.
But fret not! Over on Stack Overflow I discovered an excellent work-around from Saleel. Saleel suggests that instead of using autoFocus, give your TextInput a ref, and then use that ref from within the Modal’s onShow method to call the TextInput’s .focus() method:
This blog post is brought to you by the developer of BitBudget. BitBudget is an automated budgeting app for Android and iOS which syncs with your bank account and helps you avoid overspending. If you’d like to quit living paycheck-to-paycheck and get a better handle on your finances, download it today! https://bitbudget.io
Having trouble working with FlatList’s in React Native? Something I have been struggling to figure out recently is how to go about excluding certain items and rows when rendering a FlatList in React Native. For example, let’s say you have an array of items stored in either Redux or in React’s built-in component state and you want to remove the item? Well this is fairly straight forward, you just remove the item from the store and the FlatList will update accordingly. However, what if you want to keep the item in the store but you want to filter it out from your FlatList?
Unfortunately the React Native docs don’t mention how to do this exactly. Furthermore, I wasn’t able to find any blog posts or Stack Overflow answers regarding this either. However, I was able to stumble upon the answer today while experimenting, so here is the answer:
If you wish to skip, filter, remove, or omit an item from your FlatList, add some conditional logic to your <FlatListItem /> component’s render method so that it returns nothing <></> when passed a particular prop. For example, take a look at my GitHub gist below. In the example I have a list of three items stored in my my <App/>’s component state. The three items are called “foo”, “bar”, and “baz”. Now, in the <FlatListItem />’s render method I have added some logic which states if the item is equal to “bar”, render nothing <></>.
So that’s all there is to it! Break the items you wish to render off into their own class components, and then add some logic to render nothing <></> under some particular condition, and React Native will simply skip over that item when rendering the FlatList.
Yesterday, the This Week in Startups podcast featured an interesting guest with a fantastic tale: Delane Parnell, CEO and founder of PlayVS— the “Official High School eSports League.” The thing that stuck out for me watching the episode was the guest’s seemingly unbelievable story. Parnell paints an origin story of himself as a sort of business prodigy who from a young age was always destined for great success. He claims to have kicked off his entrepreneurial career by opening his own cell phone store in Detroit at age 16 while still in High School, before moving on to start his own car rental business around the same time.
After selling his stores and car rental business, Parnell became a figure in the Detroit startup scene by launching his own startup event and speaker series modeled after Jason Calacanis’s Launch Festival. Leveraging his newly found status in the Detroit entrepreneur scene, Parnell landed a job at a small seed stage Venture Capital firm becoming the youngest black Venture Capitalist in America.
All of this leads to Parnell meeting LA based startup founder and venture capitalist Peter Pham at SXSW in 2017 who convinced him to “move to LA to become a billionaire.” Enticed by Pham, Parnell moves to Los Angeles and goes on to raise nearly $100,000,000 for his newly founded startup, PlayVS, in just 13 months!
But it makes you wonder: How did a young man with little experience in eSports, no computer programming skills, and no experience creating tech startups, convince investors to give him $96,000,000? Had Parnell raised $96,000 the story above might make some sense. But $96,000,000?
From my research PlayVS’s footprint and web presence does not match the amount of funding they have raised. They have a very small following on Twitch, around 1,000 followers. And after registering as a player (and coach) on their website, I discovered that their website is empty and unfinished. From what I could tell, they are currently using a lean startup style website that appears at first glance to be fully functioning, but is really just a tool for collecting email addresses. According to Parnell there is currently a wait-list to join, so that maybe explains a few things. But from my research it certainly looks a lot like vaporware to me. For example, here’s what the website looks like if you signup as a player:
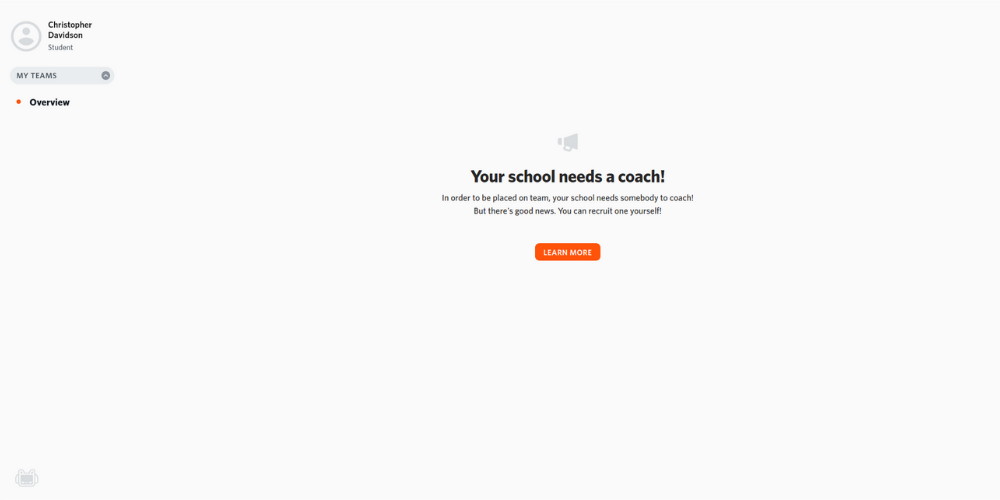
The site simply notifies the player that his school needs a coach. Sounds reasonable right? But after registering a coach account with a different email address, the website is empty for coaches as well:
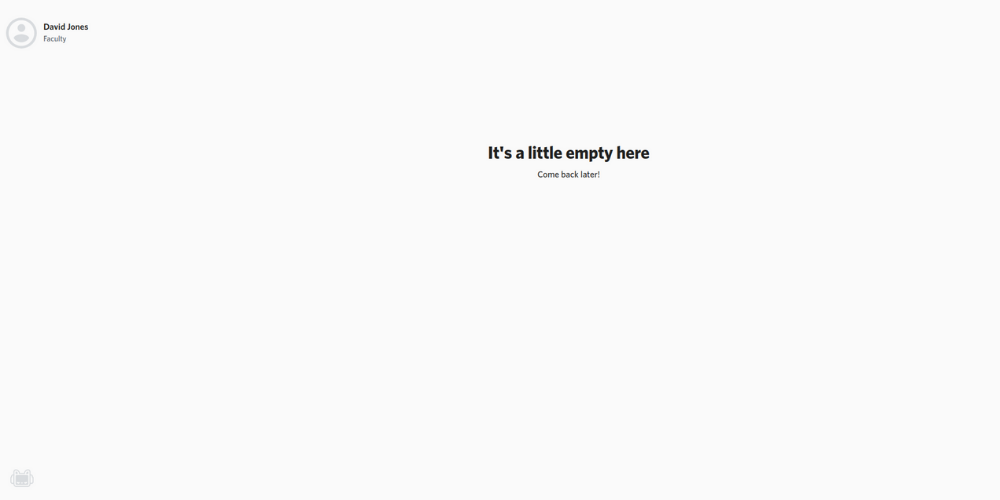
There’s nothing there! You can click on the user icon to update the coaches personal information, but that’s it! So when Parnell says that there is currently a “waitlist,” it’s quite possible that PlayVS hasn’t actually built anything yet and is using the term “waitlist” as a convenient euphemism.
I don’t know. I may be wrong, but what do you think? Could Delane Parnell be the next Evan Spiegal? Or is he the next Billy McFarland? Only time will tell, so we’ll have to see how this post ages. But if PlayVS does happen to fail spectacularly, you heard it here first!
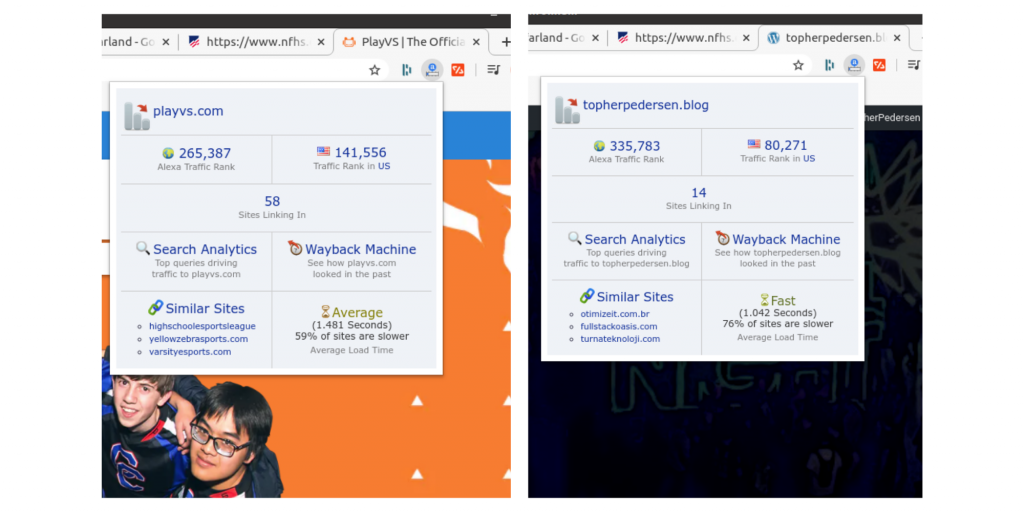
Note, at the time of this blog post https://topherpedersen.blog has a higher Alexa Internet Ranking in the United States than https://playvs.com. Red flag?
This blog post is brought to you by the developer of BitBudget. BitBudget is an automated budgeting app for Android and iOS which syncs with your bank account and helps you avoid overspending. If you’d like to quit living paycheck-to-paycheck and get a better handle on your finances, download it today! https://bitbudget.io
At the moment I happen to be working on a personal finance app called BitBudget, where I need to be able to figure out if two purchases were made with the same merchant, or different merchants. For example, does a financial transaction labeled “VZWRLSS*PRPAY AUTOPAY 02/19 PURCHASE” represent a transaction with the same company as “VZWRLSS*PRPAY AUTOPAY 03/19 PURCHASE”? What about “CALM 03/26 PURCHASE” and “CALM 02/26 PURCHASE INTERNET”? Many transactions are easy to compare, “McDonald’s” vs “Amazon”, or “Chipotle Mexican Grill” vs “Starbucks”, but once banks and payment processors start throwing in all this extra information things get tricky.
While I personally am not really a computer science / algorithms kind of guy, sometimes you really need an algorithm to get the job done! So if you find yourself in the same boat I have your answer right here. After a quick google search on this topic I discovered that there appear to be three different types of string comparison algorithms:
If you’d like to read more about the three types of algorithm’s I suggest reading: String similarity — the basic know your algorithms guide!
For my use-case, I decided that an Edit Distance Based algorithm would be the quickest strategy to implement myself, so that’s what I’m going with and would like to present below. The actual code that I will end up using in my app may feature a few modifications for speed, such as shortening the number of iterations before returning a result, but what I have so far should be a good start if you need something quick and easy:
This blog post is brought to you by the developer of BitBudget. BitBudget is an automated budgeting app for Android and iOS which syncs with your bank account and helps you avoid overspending. If you’d like to quit living paycheck-to-paycheck and get a better handle on your finances, download it today! https://bitbudget.io
If you happen to have stumbled upon this post I apologize, I’m not going to be doing a lot of explaining here. Rather, I really just wanted to post this little snippet of code for my own reference so I don’t lose it! But hey, maybe you’ll find it useful too…
This blog post is brought to you by the developer of BitBudget. BitBudget is an automated budgeting app for Android and iOS which syncs with your bank account and helps you avoid overspending. If you’d like to quit living paycheck-to-paycheck and get a better handle on your finances, download it today! https://bitbudget.io
Having trouble trying to push an old commit back to the top of your master branch in GitHub? This can be quite the doozy! I find myself frequently wanting to return my GitHub repository back to a previous state, and Git does not make this easy to do! What usually happens for me is that whenever I’m ready to finally push the previous commit back to the master branch, I end up running into a merge conflict. Ouch.
So, this is what you need to do if you find yourself in this situation. First, checkout the old commit that you want to restore your repository to (replace ‘c0mm1t1d’ with the commit id you want to checkout):
$ git checkout c0mm1t1d
Then create a new branch to work with:
$ git switch -c my-new-branch
$ git push origin my-new-branch
For good measure, make a small change to your new branch and commit the change. I suggest adding a comment or some other superficial change so you can verify that your repo has been updated exactly the way you like. Then commit the change:
$ git add -A
$ git commit -m "bug fix"
$ git push origin my-new-branch
Now time for the magic! We will merge our new branch back into the master branch using the “favor ours merge strategy” to ensure that our new branch is favored over the old branch should any merge conflicts arise:
$ git merge -s ours master
$ git checkout master
$ git merge my-new-branch
$ git push origin master
Alight, so there’s one last key piece of information I must mention: At some point you are going to be prompted to “Please enter a commit message to explain why this merge is necessary”, and then will get stuck inside of some awful vi/vim editor which you can’t get out of. Here’s what you need to do! Enter a short message explaining the merge, press ESCAPE, type:
:wqThen press ENTER again to exit the prompt. And that’s it! Your repo and master branch are back in business.
This blog post is brought to you by the developer of BitBudget. BitBudget is an automated budgeting app for Android and iOS which syncs with your bank account and helps you avoid overspending. If you’d like to quit living paycheck-to-paycheck and get a better handle on your finances, download it today! https://bitbudget.io
Welcome back dear internet friend!
So it looks like you’re having trouble getting Realm Version 5.0.0 in your React-Native app? It’s not your fault! For the past several hours I’ve found myself banging my head against the wall with the same problem, and here’s what I’ve discovered: Realm has not updated their JavaScript documentation to match version 5.
That’s right, while the documentation may “say” that it’s for version 5, as of April 2020 the code samples are all for version 4 and likely will not work if you’ve gone ahead and installed version 5. The fix for this is simple however. Just go ahead and uninstall version 5, and then install version 4 and all shall be well!
$ npm uninstall --save realm
$ npm install --save realm@4.0.0-beta.0
$ cd ios
$ pod install
$ cd ../
Then try running you’re app again…
$ npx react-native run-android
Furthermore, I think the reason behind this mistake by the Realm team is that they are primarily focused on iOS first, and Android second, and React-Native/NodeJS last! So if you are doing native iOS development you probably should be using version 5 if you’re starting a new project. But if you’re a React-Native or Node developer, you definitely want to be using version 4 until they updated their docs.