By accessing the app “Surf with Swayze,” you are agreeing to be bound by these terms of service, all applicable laws and regulations, and agree that you are responsible for compliance with any applicable local laws. If you do not agree with any of these terms, you are prohibited from using or accessing this site. The materials contained on the Surf with Swayze app are protected by applicable copyright and trademark law.
2. Use License
Permission is granted to temporarily download one copy of the materials (information or software) on Christopher Pedersen’s app for personal, non-commercial transitory viewing only. This is the grant of a license, not a transfer of title, and under this license you may not:
modify or copy the materials;
use the materials for any commercial purpose, or for any public display (commercial or non-commercial);
attempt to decompile or reverse engineer any software contained on Christopher Pedersen’s app;
remove any copyright or other proprietary notations from the materials; or
transfer the materials to another person or “mirror” the materials on any other server.
This license shall automatically terminate if you violate any of these restrictions and may be terminated by Christopher Pedersen at any time. Upon terminating your viewing of these materials or upon the termination of this license, you must destroy any downloaded materials in your possession whether in electronic or printed format.
3. Disclaimer
The materials on Christopher Pedersen’s app are provided on an ‘as is’ basis. Christopher Pedersen makes no warranties, expressed or implied, and hereby disclaims and negates all other warranties including, without limitation, implied warranties or conditions of merchantability, fitness for a particular purpose, or non-infringement of intellectual property or other violation of rights.
Further, Christopher Pedersen does not warrant or make any representations concerning the accuracy, likely results, or reliability of the use of the materials on its app or otherwise relating to such materials or on any sites linked to this site.
4. Limitations
In no event shall Christopher Pedersen or its suppliers be liable for any damages (including, without limitation, damages for loss of data or profit, or due to business interruption) arising out of the use or inability to use the materials on Christopher Pedersen’s app, even if Christopher Pedersen or a Christopher Pedersen authorized representative has been notified orally or in writing of the possibility of such damage. Because some jurisdictions do not allow limitations on implied warranties, or limitations of liability for consequential or incidental damages, these limitations may not apply to you.
5. Accuracy of materials
The materials appearing on Christopher Pedersen’s app could include technical, typographical, or photographic errors. Christopher Pedersen does not warrant that any of the materials on its website are accurate, complete or current. Christopher Pedersen may make changes to the materials contained on its app at any time without notice. However Christopher Pedersen does not make any commitment to update the materials.
6. Links
Christopher Pedersen has not reviewed all of the sites linked to its app and is not responsible for the contents of any such linked site. The inclusion of any link does not imply endorsement by Christopher Pedersen of the site. Use of any such linked app is at the user’s own risk.
7. Modifications
Christopher Pedersen may revise these terms of service for its app at any time without notice. By using this app you are agreeing to be bound by the then current version of these terms of service.
8. Governing Law
These terms and conditions are governed by and construed in accordance with the laws of TX and you irrevocably submit to the exclusive jurisdiction of the courts in that State or location.
Having some trouble using Certbot to install an SSL certificate for your website? Getting hit with an error message that looks something like?:
Failed authorization procedure. yourdomain.com (http-01): urn:ietf:params:acme:error:dns :: No valid IP addresses found for surfwithswayze.xyz
IMPORTANT NOTES:
The following errors were reported by the server:
Domain: yourdomain.com Type: None Detail: No valid IP addresses found for surfwithswayze.xyz
Your account credentials have been saved in your Certbot configuration directory at /etc/letsencrypt. You should make a secure backup of this folder now. This configuration directory will also contain certificates and private keys obtained by Certbot so making regular backups of this folder is ideal.
Okay, so here’s what’s probably going on: You just bought your domain name, set your nameservers, uploaded a landing page to your server etc., then wham! Certbot just doesn’t want to add that little https to your URL. The issue may be that your newly registered domain name hasn’t propagated through the internet’s DNS registry yet so Certbot is having a hard time finding the corresponding IP Address for your new domain.
The solution? Just give GoDaddy or whoever else you used to register your domain a little more time update everything and try running Certbot again.
If you’d like to test this hypothesis out, try visiting your new domain through Google Chrome AND Mozilla Firefox AND/OR Apple Safari. I found that while Google Chrome could not find my new domain, Firefox found the new domain easily and displayed my placeholder landing page just fine, albeit with an “unsecure” icon indicating that the site had not yet been secured with an SSL certificate. Likewise, it appears Certbot itself can’t find the newly registered domain either, just like Google Chrome. If you happen to have multiple browsers, try visiting your domain from different browsers to see if you can duplicate what I’ve described above. If you find that your website isn’t showing up yet, give your registrar and the World Wide Web a little time to process things and try again.
Run into the following bug trying to get TypeScript up and running in VSCode on your Windows machine?
The file tsc.ps1 is not digitally signed. You cannot run this script on the current system. For more information about running scripts and setting execution policy, see about_Execution_Policies at https:/go.microsoft.com/fwlink/?LinkID=135170.
Okay so here’s the deal. You probably installed the TypeScript compiler using the Windows Command Prompt or possibly the built-in PowerShell terminal from within VSCode. Installing TypeScript using the Command Prompt or the built-in terminal in VSCode will both cause your system to throw the nasty error above when you actually attempt to start using the TypeScript compiler.
Okay so… then what do we need to do? Well here’s your answer:
First, uninstall TypeScript.
$ npm uninstall -g typescript
Next, open up the Windows PowerShell (not the built-in PowerShell in VSCode) making sure to run the program as an administrator. If you don’t know how to do this, search for “PowerShell” in the search bar next to the Windows Start Button in the lower left and corner of your screen. Then right-click on “Windows PowerShell” and select “Run as administrator”. From the Windows PowerShell, you can now re-install TypeScript with administrator privileges which will fix the permissions related bug mentioned above.
$ npm install -g typescript
Now go ahead and re-open your TypeScript project in VSCode and compile it like normal, and everything should work A-okay 👌.
Getting to hello, world in Django is kind of a pain. If you find yourself having some trouble getting up and running on your Windows machine and want to get to “hello, world” as quickly as possible, I hope you find my cheat sheet below helpful. This isn’t really tutorial. For that, I suggest going through the official Django Polls App Tutorial. However, if you just want a quick reference for the future, this is the guide for you!
This file contains hidden or bidirectional Unicode text that may be interpreted or compiled differently than what appears below. To review, open the file in an editor that reveals hidden Unicode characters.
Learn more about bidirectional Unicode characters
Having trouble figuring out how to contribute code to someone else’s GitHub repo? Git can be quite complicated, so there’s no wonder why you might be having trouble with this. In fact, I found myself today struggling with this same issue attempting to contribute to an open source project for the first time. Thus, here I am writing this post, more or less for my own personal reference. So without further ado… How to Contribute Code to Someone Else’s GitHub Repo
First, you are going to want to fork the other user’s project. This is not intuitive at all. One would think that simply cloning the users project to your local machine and submitting changes from your local project would make the most sense, but this simply isn’t how it’s done. You are going to want to press the “fork” button on the other user’s GitHub.com page to get started. This is your first step.
Next, when you are ready to start working on your new feature or contribution, it’s time to create a “feature branch” which you will be using to develop your new feature or contribution. We’ll start by cloning your recently created fork to your local machine:
After creating your new branch, make some changes to the code on your local machine remembering to hit the “save” button in your text editor or IDE. After saving your changes, let’s stage, commit, and push your changes to your forked GitHub repository:
$ git stage .
$ git commit -m "my first open source commit"
$ git push origin my-feature-branch
Now that we’ve pushed our work to the feature branch of our forked GitHub repository, we can push the “submit pull request” button on GitHub.com to contribute our code to the other user’s GitHub repository. Note, we will be contributing the code from my-feature-branch on our forked repository over to the master branch of the other user’s repository. This is the default setting whenever you push the “submit pull request” button from a forked repository on GitHub.com. GitHub assumes you are wishing to submit the pull request to the original repository which you forked.
Assuming that the other user accepts our pull request, now we will need to sync our forked repo once again with the other user’s repo. This is another one of those not-obvious quirks that I found hard to grasp at first. Once we submit a pull request from a feature branch to the other user’s master branch, our master branch on our fork will actually be out of sync with the other users master branch. So this last little gem here will let us get everything back in sync:
(Sync Forked Master Branch with Other User’s Master Branch)
$ git checkout master
$ git merge upstream/master
Now everything should all be in-sync. To contribute more code simply go back to step one, create a new feature branch (with a different name) and repeat the steps above.
(Loose) Transcription of Episode 35 of Misadventures in Startups
[Please don’t actually read this blog post, watch the video above!]
I just included a transcription here on the blog so Google might send a little traffic my way. But if you insist…
Welcome back internet friends! Topher Pedersen here, again with more misadventures in startups. Today, I want to talk about getting blocked, banned or suspended from AngelList. AngelList— a whole lot of hype around AngelList. You’re always seeing Naval Ravikant everywhere. He was on Joe Rogan’s podcast last year. So if you’re into startups and you’re watching this video, Obviously you’re like, “Hey, how do I get into AngelList? How do I do this stuff?” And you’re on there trying to raise some money. Maybe you’ve been doing a little research and you’ve send your first messages to some angel investors and… WHAM! You get blocked, banned, suspended!
So what’s the deal with that? All right, well here’s the thing: AngelList is not for you.
AngelList, despite how they market themselves as you know, democratizing venture capital, etc. etc. is not really for you. It’s actually quite elitist.
What I mean by that is it’s not elitist in a racial or socio-economic background kind of way. But it is really is about who you know. It’s NOT about what you know. Very cliché saying, but that’s honestly how AngelList operates.
So I’m assuming that if you’re reading this blog post, that this has happened to you: You signed up for AngelList, you made a profile, and then were like now what? What do I do now? It’s very much like early Facebook back in 2005 – 2006. Back then If you signed up for Facebook, you really just had a profile. There wasn’t a whole lot, other than that, and you could like send messages but that was about it. And that’s very much what AngelList is like today. You make a profile for your startup and you can message investors. But the search functionality on AngelList is not really very good. The only thing you can really do is see who your direct connections are, and maybe friends of friends (secondary connections). But if you’re like myself, and you don’t live in Silicon Valley, you don’t work for a Silicon Valley company as an engineer, you’re not friends with other Silicon Valley engineers or angel investors: You’re not going to have any connections.
And that’s kind how AngelList is designed. It’s all built around connections. So it’s really an insiders game. Now… You don’t have to be like a super-insider; you just have to be someone who’s in Silicon Valley and working as an engineer and have some sort of small social network of friends that are on AngelList. So in that case, you might meet some people and possibly raise money. But if you’re like myself, and you’re outside of Silicon Valley, you don’t have any connections, and you kind of just start cold emailing people— There’s a good chance that you will get blocked banned or suspended from AngelList once you start trying to reach out to investors.
Take my case for instance: I think there’s two reasons why I may have been blocked. Like I said, AngelList’s search functionality is not really very good. And you’ll notice if you try to just look at your connections, or everyone, AngelList’s search results will return tons of people that have just made one angel investment. And maybe that’d be fine if they made the angel investment recently, but you have no idea when they made that one angel investment, it could have been 10 years ago. For example, when searching for angel investors here in Texas the search results returned 16,000 results! or something crazy. How do you sort through all of that to find the real angel investors who are actively searching for deals and investing in companies regularly?
The solution that I found is to use Google. I came up with a pretty good search query that did the trick fairly well:
“VIA ANGELLIST” site:angel.co/p/
And then if you want to take it up a notch, you can start adding in the number of deals into your search queries…
“10 VIA ANGELLIST” site:angel.co/p/
“23 VIA ANGELLIST” site:angel.co/p/
And so on and so on, from 1 to 250.
I entered these search queries into Google manually by hand, but it probably would’ve been easier as a bot. Even so, Google actually flagged me as a bot a few times. I had to do the captcha thing to prove I wasn’t a robot. After spending a night doing this research, I discovered some interesting stuff:
I found there are 1,474 investors that have made between one and nine investments.
245 investors that have made 10 to 19 investments.
94 investors have done 20 to 29 investments.
102 investors have done 30 to 49 investments.
90 investors have done 50 to 99 investments.
62 investors have done between 100 and 199 investments.
9 investors have done between 200 and 250 investments.
And there are a few people that have done even more than that!
Now I did not actually compile this list and publish it. I know angel would probably not want me doing that. So it kind of just kept it to myself. But my plan was now that I kind of know how many investors there are, and how many deals they happen to do: Who do I want to target?
I found it was really hard to track time frequency of investment, but total number of investments was kind of the best that I was able to personally figure out. And I wasn’t even able to do it through AngelList’s website. Like I said, I had to do it through Google! So that could be one reason that I got blocked. Maybe AngelList just saw that there was a ton of traffic coming from my computer. I was browsing their site pretty heavily. So maybe CloudFlare maybe like flagged my IP address. So that could be one reason that I got blocked.
I also sent 11 cold messages to investors on the site over two days. So maybe an investor on the site flagged me as a spammer? Whatever the reason… Bam! Blocked! Suspended! Do not pass go. Do not collect angel investment.
I know there’s tons of hype behind AngelList. If you follow the startup world/eco-system it’s easy to get caught up in the hype. You have this feeling like, “Oh, I need to be on AngelList!” But what do you do after signing up and creating a profile? Now what? What do I do? Wait? Well, here’s my recommendation: You don’t need AngelList. AngelList isn’t for you anyway.
But you know what solution there is that IS for you… Crunchbase!
If you haven’t heard of Crunchbase, Crunchbase is website and database created by Mike Harrington of TechCrunch fame. I think it started out as a database of startups. But now also includes a database of investors as well. And they cover all different stages of investments. But what you are going to want to search for, if you have an early stage startup, are investors that are doing pre-seed and seed stage investing.
I’ve had a Crunchbase subscription for a while now, just out of interest, so can kind of see what’s going on. Who’s raising money? Who are the active investors? Etc. etc. But what I was trying to use AngelList for, identifying potential investors, I’ve found you can do really easily on Crunchbase.
So that’s my solution to you if you’ve been blocked, banned, or suspended by AngelList. Just go try Crunchbase instead. It does cost $300 a year. So if you don’t have $300 to spend on something like that, then maybe don’t do it. But if you can spare the $300 I would recommend it.
It’s not a must have. It’s just a tool that’s out there. I’m sure it costs them money to maintain their database. So if you want to check it out, head over to crunchbase.com. The product is called Crunchbase PRO. The only big difference between Crunchbase and AngelList is that it mainly lists funds, not individual angel investors. But like I said, there are tons of pre-seed and seed stage funds on there investing in the same stage startups as the angel investors over on AngelList.
And one of the cool things is that they’re actually putting in a lot more money than the individual angel investors. They’re not putting in $25,000 checks. They’re doing like $2 million seed deals!
For a company like mine where I don’t have very much traction, I don’t think I’d be able to raise something crazy like $2 million. But there are some funds doing much smaller deals as well. So it’s worth checking out in my opinion even if you aren’t trying to raise seven figures.
Well that’s the end of my rant internet friend. Crunchbase is better than AngelList. The end.
Banging your head against the wall trying to ad Sign in with Google to your React Native application? If the error message you keep running into happens to be DEVELOPER_ERROR, I think I have your fix.
For me, the problem was my build.gradle file for my React Native Android app. The app I happen to be working on has already been published on the Google Play Store, so the production version of the app has been signed using a release version keystore. Apparently I deleted the configuration for the debug version of the app, which did not cause me any problems other than breaking Sign in with Google.
Writing about obscure app configurations can be tough. Does any of what I wrote above make any sense? Probably not! So to make things a little clearer here is what my build.gradle file looked like that did NOT work with Google Social Login:
This file contains hidden or bidirectional Unicode text that may be interpreted or compiled differently than what appears below. To review, open the file in an editor that reveals hidden Unicode characters.
Learn more about bidirectional Unicode characters
And here is the corrected build.gradle file that works with Google Social Login:
This file contains hidden or bidirectional Unicode text that may be interpreted or compiled differently than what appears below. To review, open the file in an editor that reveals hidden Unicode characters.
Learn more about bidirectional Unicode characters
I’m sure there are a million different ways you can screw up implementing Sign in with Google, however, if you were able to get Google Social Login to work in a test app, but are having trouble getting it to work in your production app, then this might be your problem.
Also, you need to make sure that you have registered a development and production version of your app in the Google Developer Console. For example, let’s pretend you only have one app registered and it’s working great during development. Then you try to use Sign in with Google in the release version of your app. If you’ve only registered the debug version of your app in the console, Google Social Login isn’t going to work in the release version of your app. So, make sure you register a debug version of your app in the Google Developer Console, and then create a second release version of your app in the Google Developer Console as well. You can pretty much use all of the same code in your app, you will just need to write some logic to toggle between the two different clientIds depending on whether you are running the debug version of your app or the release version of your app.
I know that isn’t very intuitive, or self explanatory, so I’ll clarify: You have to register 2 different applications in the Google Developer Console. While you are developing your app you only need one. But after you go to publish the production version of your app, you will need to register it as a completely different app. Doesn’t make much sense does it? But that’s the way it is!
Last, this blog post really only deals with a rare edge case involving build.gradle. So if you do not find this particular post helpful please follow along with the official react-native-community/google-signin or expo-google-sign-in docs. However, this problem was quite a doozy for me! So hopefully this post will end up helping someone out there.
I noticed that the default search engine and homepage in my Firefox web browser recently changed from Google to some super sketch search engine called Adaware Secure Search from a company called Lavasoft. And since you’re reading this blog post on the topic, I assume you are currently running into the same issue and are equally perplexed. Well fret not internet friend! I have your answers right here:
First, to get rid of Adaware just download Malwarebytes from malwarebytes.com. No need to purchase a subscription or anything, just use the free version. Run the scan, and let Malwarebytes do it’s thing.
Second, after running Malwarebytes you’ll discover the source of this Adaware malware garbage: FileZilla! (The FTP Program) Now if you aren’t a user of FileZilla FTP, it’s possible Lavasoft is distributing their malware through other free software in addition to FileZilla. But in my case, FileZilla was the culprit. With that being said, I still really like FileZilla as an FTP client. But it is kind of sad that they’ve resorted to installing crap like that make money.
Third, click on Options -> Home -> Restore Defaults to remove Adware Secure Search from your homepage.
So there you have it! FileZilla is guilty, Malwarebytes has the fix you are looking for, and last make sure to go to Options -> Home and click Restore Defaults to reset your homepage. 👍
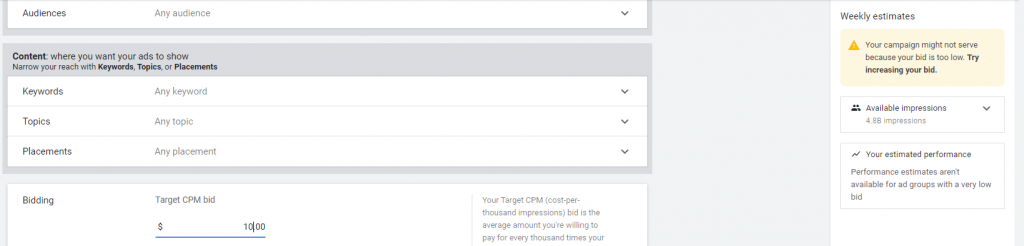
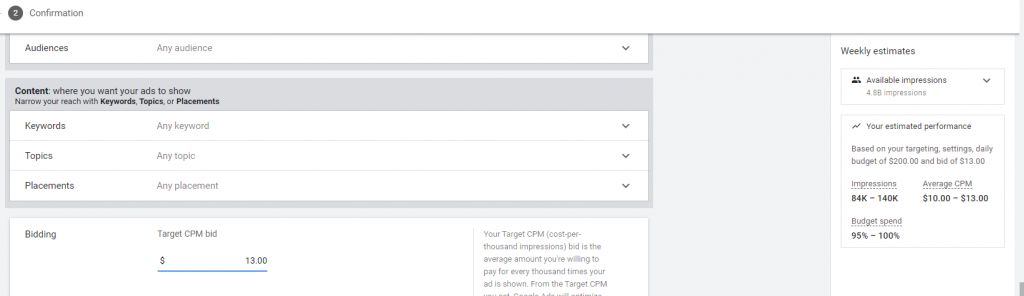
Struggling to find some basic estimates on how much your non-skippable in-stream YouTube ads are going to cost on a CPM basis? Finding recent CPM figures can be really tough! This morning I was trying to figure out how much it might cost to run some non-skippable ads on YouTube to promote my new budgeting app, BitBudget, and I was having the hardest time finding any actual figures. Well without further ado, here is the figure I found: $13
If you want to run your ads in the United States targeting 25 – 44 year olds $13 is what Google suggests it’s going to take to submit a competitive bid. How do I know this? Well I was fumbling around in the Google Ads manager and I noticed while trying to create a fake test campaign that a little yellow warning will display inside the manager if you enter too low of a CPM bid. I started at $10, and that’s when I first noticed the little yellow warning. However, after incrementing my bid one dollar at a time the warning dialog disappeared when I got to $13. So there you have it!
If you’re looking to set a competitive CPM bid for the pricier non-skippable variety of YouTube ads, $13 is a good starting point.
This blog post is brought to you by the developer of BitBudget. BitBudget is an automated budgeting app for Android and which syncs with your bank account and helps you avoid overspending. If you’d like to quit living paycheck-to-paycheck and get a better handle on your finances, download it today! https://bitbudget.io
Need to insert a hyperlink into your React Native application? This is actually super simple! Just use React Native’s built in ‘Linking’ module and open URLs with ease:
This file contains hidden or bidirectional Unicode text that may be interpreted or compiled differently than what appears below. To review, open the file in an editor that reveals hidden Unicode characters.
Learn more about bidirectional Unicode characters