Want to reload your source code changes on your Flask project running on a production Apache web server the easy way? Simply log in to your virtual server via ssh and “gracefully” restart your Apache2 web server:
$ apachectl -k graceful
Want to reload your source code changes on your Flask project running on a production Apache web server the easy way? Simply log in to your virtual server via ssh and “gracefully” restart your Apache2 web server:
$ apachectl -k graceful
This blog post is brought to you by the developer of BitBudget. BitBudget is an automated budgeting app for Android and iOS which syncs with your bank account and helps you avoid overspending. If you’d like to quit living paycheck-to-paycheck and get a better handle on your finances, download it today! https://bitbudget.io
I’ve been having a really hard time trying to install a simple SSL certificate on my DigitalOcean virtual server running Ubuntu 18 & Apache2. The certificate was purchased for $10 through 101domain.com and I think most of the frustration is coming from the fact that they issued me a .pem file instead of the .crt and .key files like which are used in essentially all of the tutorials on the subject (I’m sure that the .pem file would work, I just can’t figure out how to do it exactly). This has all been quite the headache here over the past two days. However, I think I may have found a solution!
It seems that there’s actually an organization called Let’s Encrypt that issues free SSL certificates. And the Electronic Frontier Foundation has apparently released a simple tool called Certbot that then automates the installation of these free SSL certificates issued by Let’s Encrypt. Pretty awesome right? So, I think I’m just going to forget about my $10 SSL certificate from 101domain.com, and just try setting everything up using Let’s Encrypt & Certbot instead.
NOTE: Remember to remove your CNAME record from your DNS records for your old 101domain.com SSL certificate, so you can re-do everything using the free SSL cert from Let’s Encrypt.
TUTORIAL: How To Secure Apache with Let’s Encrypt on Ubuntu 18.04
UPDATE: While I spent hours trying to figure out how to do this manually, I was able to fix everything and get up and running with HTTPS & SSL in 5 minutes using Certbot! If you happen to stumble upon this post, please reference the above tutorial on securing Apache with Let’s Encrypt. Also, if you happen to be using certbot to add HTTPS & SSL to your WordPress site, and you end up losing all of your styling (CSS), log in to your wp-admin page, then go to settings, and change your site’s domain name from http://yourdomain.com to https://yourdomain.com. Hope this post ends up helping some other poor soul desperately fumbling around with .pem files and Apache2 configuration… God bless Certbot and long live the Electronic Frontier Foundation and Let’s Encrypt!
Okay, so over the past few days I’ve been working on moving my blog over from WordPress.com to a virtual private server on DigitalOcean powered by the open source WordPress software. The reason behind the move is that I wanted to install a plugin for posting source code on my WordPress blog, something that was actually much harder than I would have ever thought. However, to install the necessary plugin, Automattic (the parent company of WordPress.com) wanted to increase my monthly plan from $4 a month to $25 a month! Pretty steep hike right?
Well I’m finally wrapping everything up with the move, and wanted to write this quick post to take my new SyntaxHighlighter Evolved WordPress plugin for a spin! Hint: if you don’t know what the SyntaxHighlighter Evolved plugin is, it’s what you need to install on your WordPress server to easily start posting source code on your blog:
<?php
    echo "<p>hello, world</p>";
?>
As I mentioned in my previous post I’m looking into installing a WordPress plugin to make it easier for me to share computer code snippets here on the blog. However, when I looked in to doing this on WordPress.com, Automattic (WordPress.com’s parent company) wanted to increase my monthly payment from $4 to $25 a month! $25 seemed pretty steep to me, so I decided to move the whole site over from WordPress.com to my favorite IaaS provider, DigitalOcean. The move has actually been quite a bit of work, but I’m going to end up saving a lot of money. Instead of $25 a month I’m going to end up paying something like ~$8 per month for a cheap virtual server, a .blog domain extension, and an SSL certificate. Originally I planned on just dumping the whole SSL/HTTPS thing in favor of simple HTTP, but I don’t want to break all of my old https links that have already been indexed by Google. So… in conclusion… Goodbye WordPress.com, and hello self hosting with the power of open source software 🙂
A lot of changes going on here with the blog behind the scenes (not that anyone really cares). I found a WordPress theme that I really like called Casper, but unfortunately the new theme has sort of broken a lot of my old posts. The content is all still there, but there are just little goofy doodads around my various computer programming code snippets. The whole point of this blog is to publish programming related content so I’m working hard to get setup to where I can easily post little programming tutorials with snippets of code and whatnot. I suppose done is better than perfect so I’ll be sticking with the new theme for now despite the small bugs related to my old posts. Also, I plan on checking out some cool WordPress plugins to make it easier to share code here on the blog. Coming Soon!
This blog post is brought to you by the developer of BitBudget. BitBudget is an automated budgeting app for Android and iOS which syncs with your bank account and helps you avoid overspending. If you’d like to quit living paycheck-to-paycheck and get a better handle on your finances, download it today! https://bitbudget.io
Just wanted to bookmark a great tutorial on: Creating a Web App From Scratch Using Python Flask and MySQL. Coming from a LAMP Stack background, I’d really like to keep using MySQL, so that’s what I plan on playing around with over the next couple days. Learning Python/Flask is coming along fairly well, and I think I’m almost to the point where I can actually start building some stuff.
UPDATE (3/20/2019): Made some good progress getting MySQL all setup on my local Windows 10 development machine tonight. Note to self– pick back up with the tutorial tomorrow @ Step 1: Setting Up the Database
UPDATE (3/20/2019): Pick back up @ Step 3: Implement a Signup method
UPDATE (3/21/2019): Resume tutorial @ Step 5: Call the MySQL Stored Procedure
CONCLUSION (3/21/2019): So I just finished the above tutorial, but unfortunately received an error when attempting to actually insert data into my MySQL database. I think the problem likely has something to do with “stored procedures.” I’ve never actually used a “stored procedure” before and honestly don’t really even know what it is or why I would want one, but… I think the tutorial was helpful. My main takeaway from the whole thing was that I should look more into this library called Flask-MySQL so I can really get this figured out. Right now I have two big things I need to learn:
FURTHERMORE (3/21/2019): There appear to be multiple python/mysql libraries, so I might check some of those out as well.
YET ANOTHER UPDATE (3/22/2019): I figured out how to INSERT data into my MySQL database using the mysql.connector Python library. Here is a link to my example webapp: Flask-Plus-MySQL
Right now the demo app only shows how to INSERT data into the database. However, I will make sure to improve the demo tomorrow so that it also shows how to SELECT data from the database and then display the data using a Jinja2 template.
LAST UPDATE (3/22/2019): Finished adding some code to the example app which demonstrates how to SELECT data from a MySQL database using Python (and Flask) and then present that data back to the user using the Jinja2 templating engine.
Over the past few previous posts here on the blog I’ve been talking about Python & Flask and how I sort of got stuck today on Chapter 4 of an O’Reilly book on Flask when the author decided to throw in a 3rd party library for handling basic networking that ended up throwing me off (along with a few other choices the author made). Well… I’ve finally figured out what I’m doing and figured out how to handle basic networking in Python using Flask the way *I want to do things*.
In my opinion, you shouldn’t need a third party library to handle networking in a web-app. The whole point of learning Flask over something like Django was the simplicity of everything. So here I present: Simple Networking in Python with Flask
Another quick little blog post here for my own future reference. I’m just getting started learning Flask and it’s quite different from doing web development in PHP like I’m used to. So here are a few quick steps to get started (assumes virtualenv and python 3 have already been installed):
Create a Blank Flask App
$ cd Desktop
$ mkdir my_new_flask_app
$ cd my_new_flask_app
$ virtualenv venv
$ venv\Scripts\activate
(venv) $ pip install flask
Hello, World (helloflask.py)
from flask import Flask
app = Flask(__name__)
@app.route('/')
def index():
    return 'hello, world'
Start Local Development Server
$ set FLASK_APP=helloflask.py
$ flask run
Visit Your New App With Your Web Browser: http://localhost:5000
TLDR: Skip To The Bottom of This Post/Rant for the Answer to Handling HTTP POST & GET Requests in Python with Flask (the Easy Way)
Just sort of wanted to vent here for a minute… I’m working out of Miguel Grinberg’s Flask Web Development (2nd Edition) trying to teach myself Flask and I’m really frustrated: I’m only on Chapter 4 and this guy has already thrown in Bootstrap and another 3rd party library (Flask-WTF) and the examples are quickly growing in complexity to the point where I’m having trouble following along. I wish authors would just keep things as simple as possible. There’s no need to use every feature, and every library, when writing a programming book or tutorial. Programming is complicated enough.
O well I suppose. I got a lot out of the first three chapters, but it looks like I’m going to have to move on to another book to keep learning. Tossing in this Flask-WTF library and using the ‘extends’ and ‘block’ features in the Jinja2 templates just makes it too confusing as a complete beginner. I’m sure that the ‘extends’ and ‘block’ features are nice to have, but they aren’t appropriate this early in a programming tutorial. Just demonstrate how to do something in its most simplest form.
TAKEAWAY: Read all the programming books on a given subject. Take what you can from each book, and move on to the next when necessary.
UPDATE: Here are the three other books on Flask which I’m planning on diving into tonight–
UPDATE: Okay, so two of the three new books also jump straight into handling HTTP GET & POST Requests using Flask-WTF, but luckily Flask By Example kept things simple and demonstrated the simplest way to handle networking requests. Need to grag some GET or POST data? Simply call:
# Retrieve Data from an HTTP GET Request
from flask import request
username = request.args.get("username")
# Retrieve Data from an HTTP POST Request
# Additional Reference: https://bit.ly/2HsJtD1
# Note, we are using HTTP POST, However the
# Method Name is Still .get()
# A Bit confusing eh?
from flask import request
username = request.form.get("username")
password = request.form.get("password")
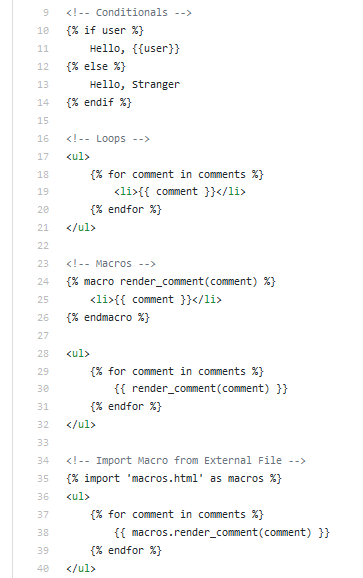
Another quick little post here for my own personal reference. Working out of Miguel Grinberg’s Flask Web Development (2nd Edition) trying to teach myself a little Flask for a new project on which I’m working, so here is a little code straight from Grinberg’s book demonstrating the basics of using control structures in Flask’s Jinja2 templating language: